This work was originally created by Anna Krystalli from RSE-Sheffield under a MIT licence (original repository). It was subsequently adapted by Malika Ihle during her time at Reproducible Research Oxford, with the contributions of Adam Kenny. This work by Elizabeth Waterfield, Sarah von Grebmer zu Wolfsthurn, and Malika Ihle is licensed under a CC-BY-SA 4.0 Creative Commons Attribution 4.0 International SA License. It permits unrestricted re-use, distribution, and reproduction in any medium, provided the original work is properly cited. If you remix, transform, or build upon the material, you must distribute your contributions under the same license as the original.
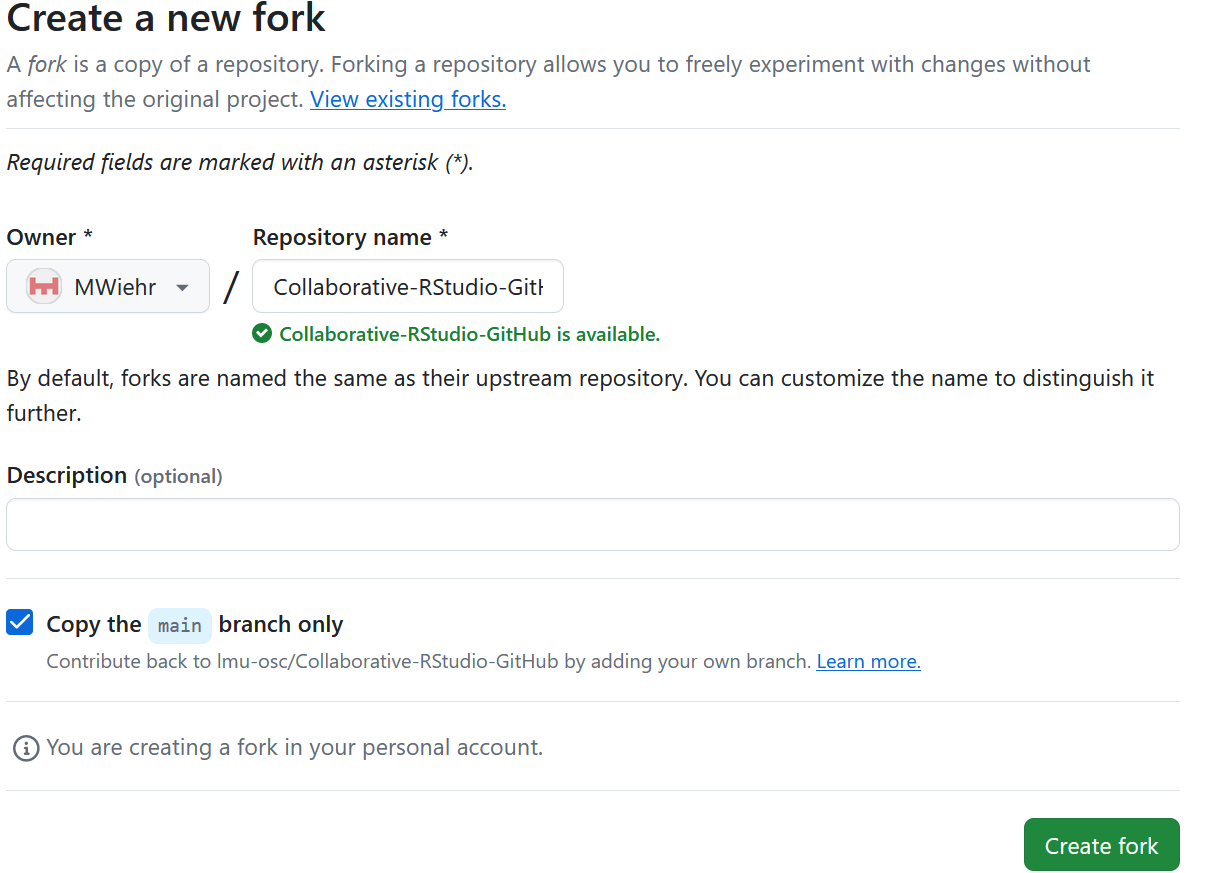
Make sure you are set as the owner of the new repository and do not change the name of the forked repository then hit “Create fork”
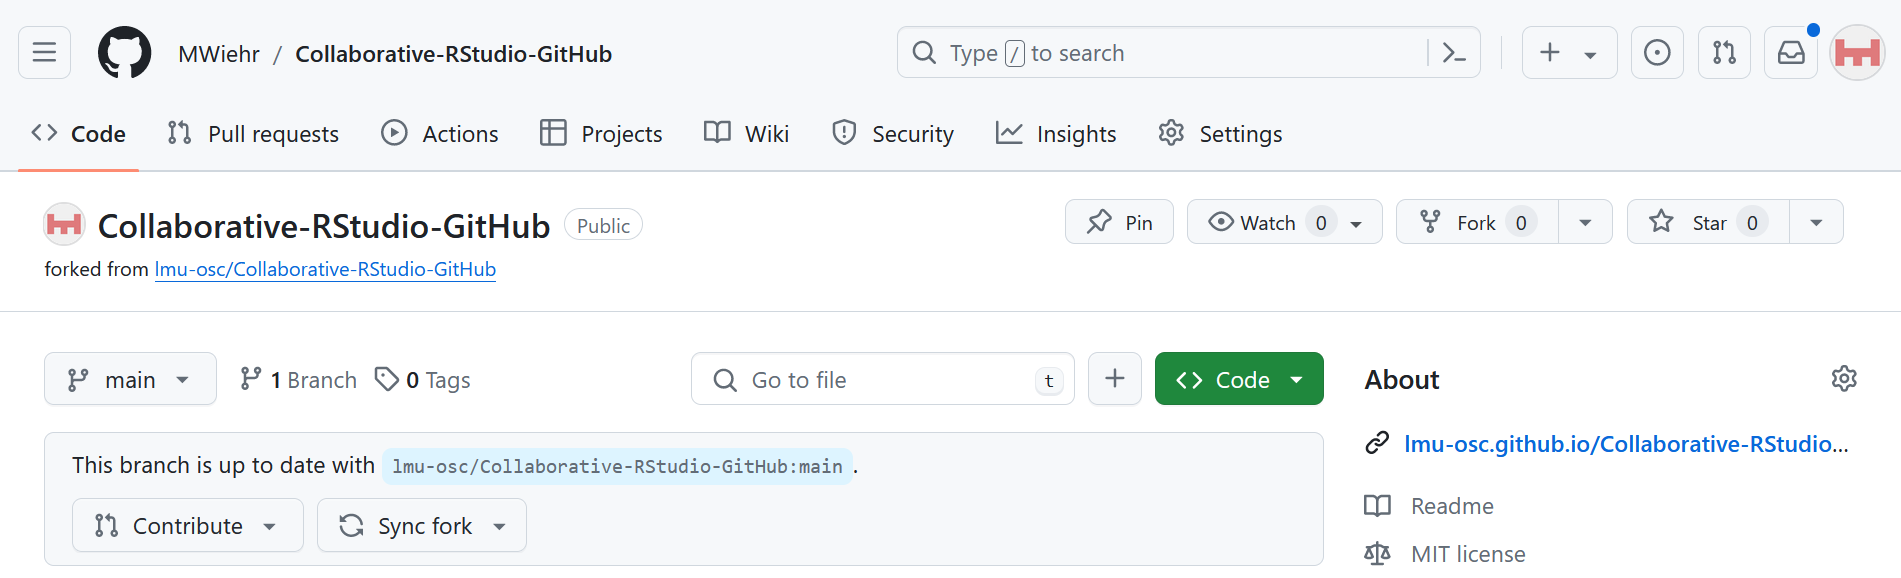
Now you have your practice repository!
You have copied all the materials from the LMU OSC Collaborative-RStudio-GitHub repository needed to do this session’s activities with your own GitHub account. This fork will be referred to as the main repository from here on and is the repository your learners will work on.
Questions from the previous submodule
Any remaining questions about the most recent content and/or practical exercises?
What is your level of familiarity with working on GitHub?
I have never heard of it before.
I have heard of it but have never worked with it.
I have basic understanding and experience with it.
I am very familiar and have worked with it extensively.
Which of the following concepts or skills do you feel most confident about in relation to Git and GitHub? (Select all that apply)
Creating and initializing a new Git repository.
Making commits and writing meaningful commit messages.
Cloning a repository from GitHub to my local machine.
Pushing local changes to a remote repository.
Pulling or fetching updates from a remote repository.
Forking a repository and working on my own copy.
I am not sure about any of these concepts.
On a scale of 1 to 5, how comfortable are you with using Git and GitHub for collaborative coding and version control? (1 = Not comfortable at all, 5 = Very comfortable)
1
2
3
4
5
Which statement best describes your experience with pushing and pulling in the context of working collaboratively on GitHub?
I have never heard about either of these concepts.
I have heard about these concepts before, but do not remember the exact details.
I have a conceptual understanding of these concepts, but have not actively integrated them into my workflow.
I have a conceptual understanding of both concepts and actively integrate them into my workflow.
Discussion of survey results
What do we see in the results?
Where are we at?
Previously:
Basic and advanced R skills (data manipulation, plotting, etc.)
Introduction to version control using Git
Up next:
Collaborating on projects remotely via GitHub
Tracking changes of each contributor on GitHub
GitHub and Open Science
GitHub offers a platform that enables transparent sharing, version control, and reproducible workflows. These are some of the core pillars of Open Science.
Learning goals
At the end of this session, you should be able to:
Navigate GitHub to collaborate on shared projects.
Fork and clone repositories to work locally without altering the main branch.
Commit, push, and pull changes to keep your project tracked and synchronized.
Design a collaborative workflow that enhances the openness and reproducibility of your own projects.
Covered in this session
GitHub workflow
Fork a repo
Clone a repo
Commit to a project
Push changes
Pull request
Merge changes
Pull upstream
Key terms and definitions
Git:
GitHub:
Git repository:
GitHub repository:
Branch:
Key terms and definitions
Git: A version control system that tracks changes made to files over time.
GitHub: A cloud-based, online platform that hosts Git-tracked projects.
Git repository: (also known as repo) A folder that contains your project files and the history of all changes made to them.
GitHub repository: An online or remote version of a Git repository that is hosted on GitHub’s servers.
Branch: A separate workspace where you can make changes without affecting the main project.
Collaboration challenges
Researchers can face many challenges when working collaboratively in a team with other researchers or in multi-organisational projects. Some of these are:
Poor communication
Disconnected collaboration
Limited transparency of project materials
Sound familiar?
Think about your past experience working collaboratively in a team. Did you face these challenges? Did similar or other challenges arise?
GitHub can help!
GitHub can help facilitate better collaboration between researchers. Here is how:
Better communication with messages describing changes made, inline commenting, and code reviewing.
The project materials are hosted and shared publicly or privately to support transparent collaboration.
By hosting the materials on online repositories, teams can work from anywhere, contribute asynchronously, and review each other’s work.
What is collaborative coding?
With collaborative coding:
Multiple people can work and contribute on different parts of the same project at once.
Using Git and GitHub keep everyone’s work organized, merged, and tracked.
There’s more transparency and reproducibility in research projects.
The project/materials are reviewed and improved collaboratively.
Zooming out: GitHub collaborations
Note
Collaborative coding is only one way a team or a research group can work together on a single project. GitHub supports collaborative coding, but more generally collaboration on many different types of materials/projects, not just code.
Creating a workflow with GitHub
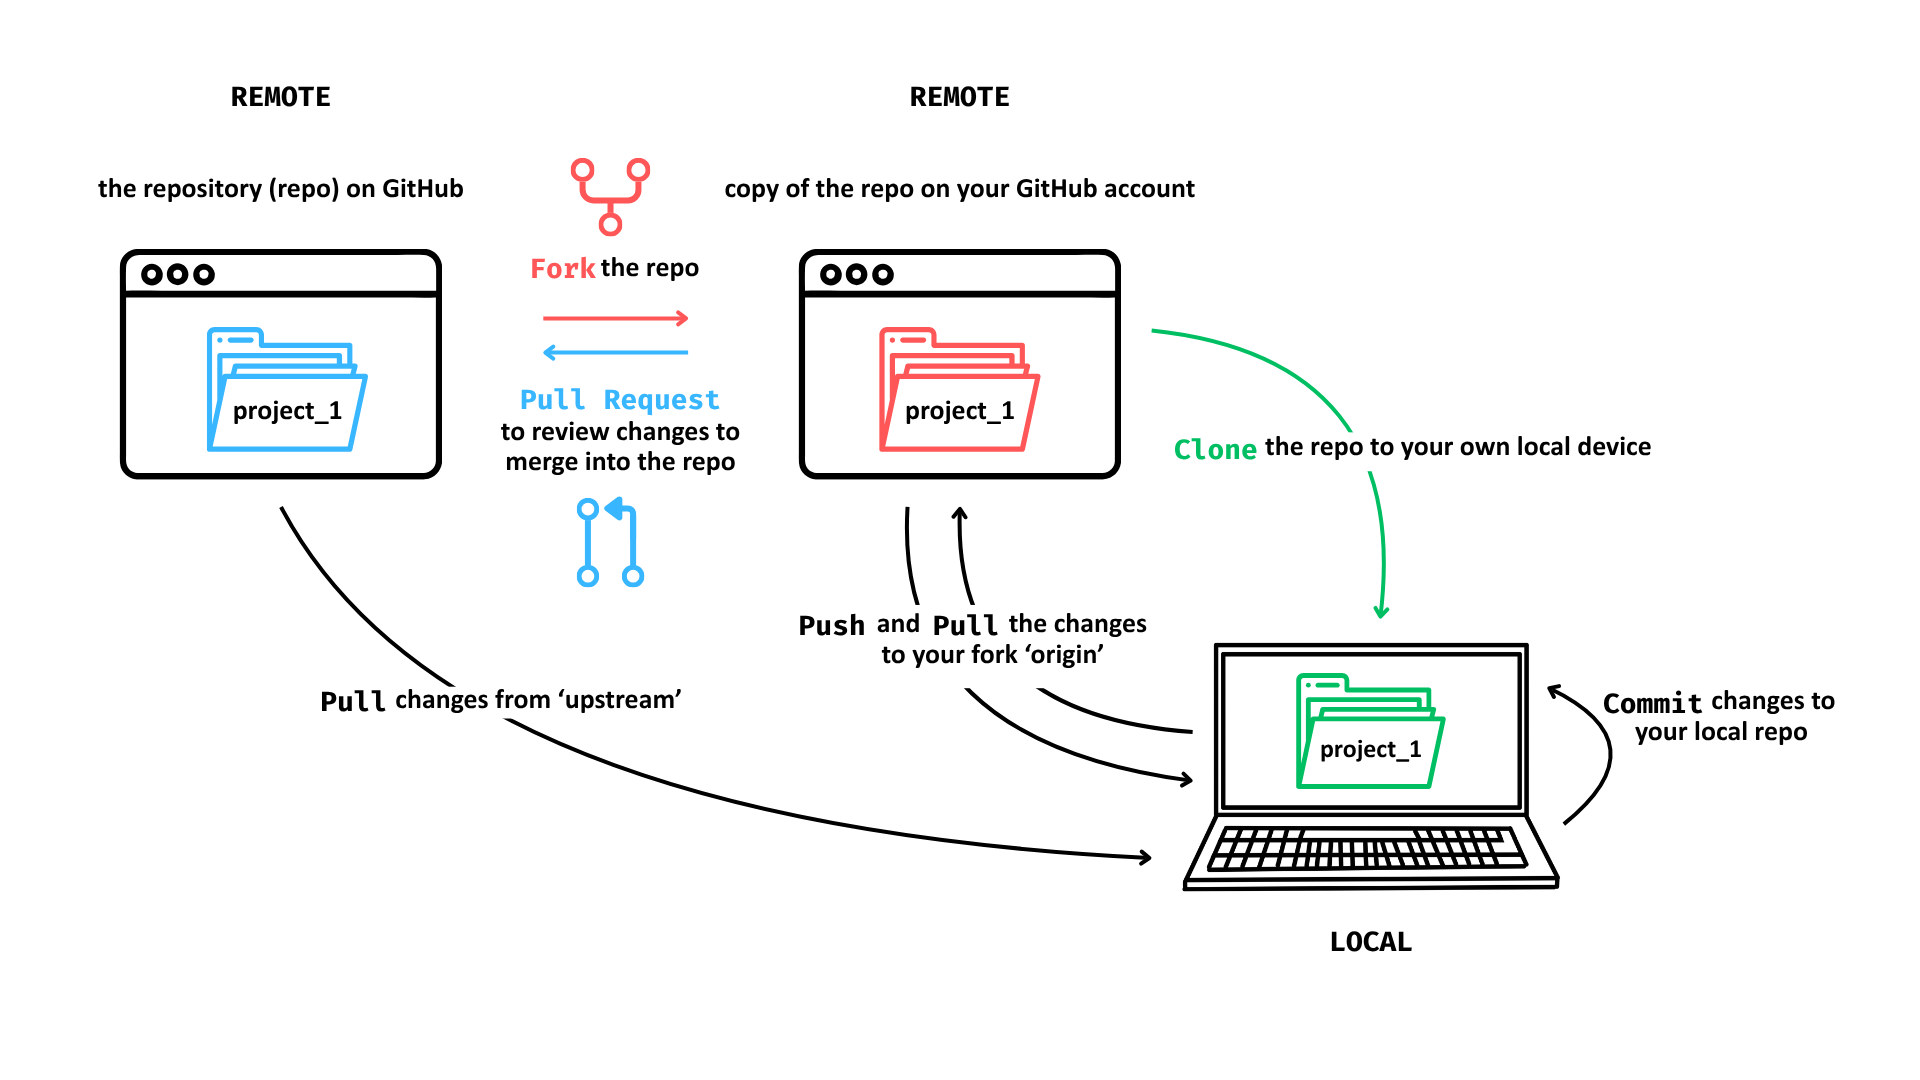
What a workflow using GitHub can look like:
Fork a repo
To fork a repo means to copy a collaborator’s repo to your own remote GitHub account.
Enables multiple contributors to work in parallel.
Make changes without affecting the original project.
Provides a personal workspace to test ideas.
Practical exercise 1: Fork a repo
Here’s a link to the main repository:
What is meant by “repo” here?
By repo on GitHub we mean one of two things: 1) the repository your instructor created on their own remote GitHub account for you to work on, or 2) an existing repo for practice e.g., https://github.com/lmu-osc/Collaborative-RStudio-GitHub/tree/main. Go to the repo that is available to you now.
Practical exercise 1: Fork a repo
Something does not look the same?
Note that the screenshot may not match exactly because it depends which repo you forked from: You may be forking from your instructor’s GitHub instead of from the practice repo from ‘lmu-osc’.
Practical exercise 1: Fork a repo
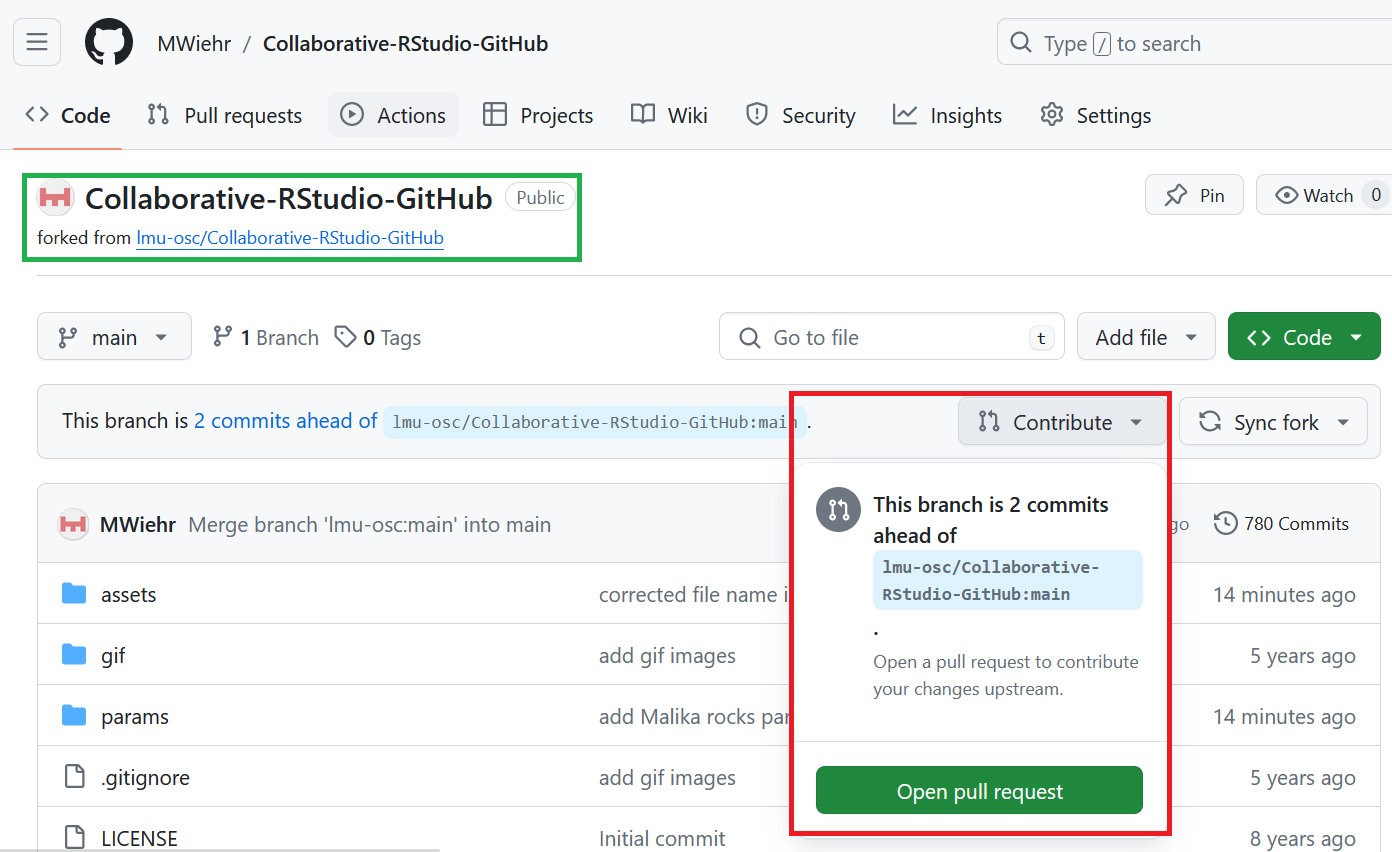
Fork a repo
You will see the fork of the repository on your GitHub account:
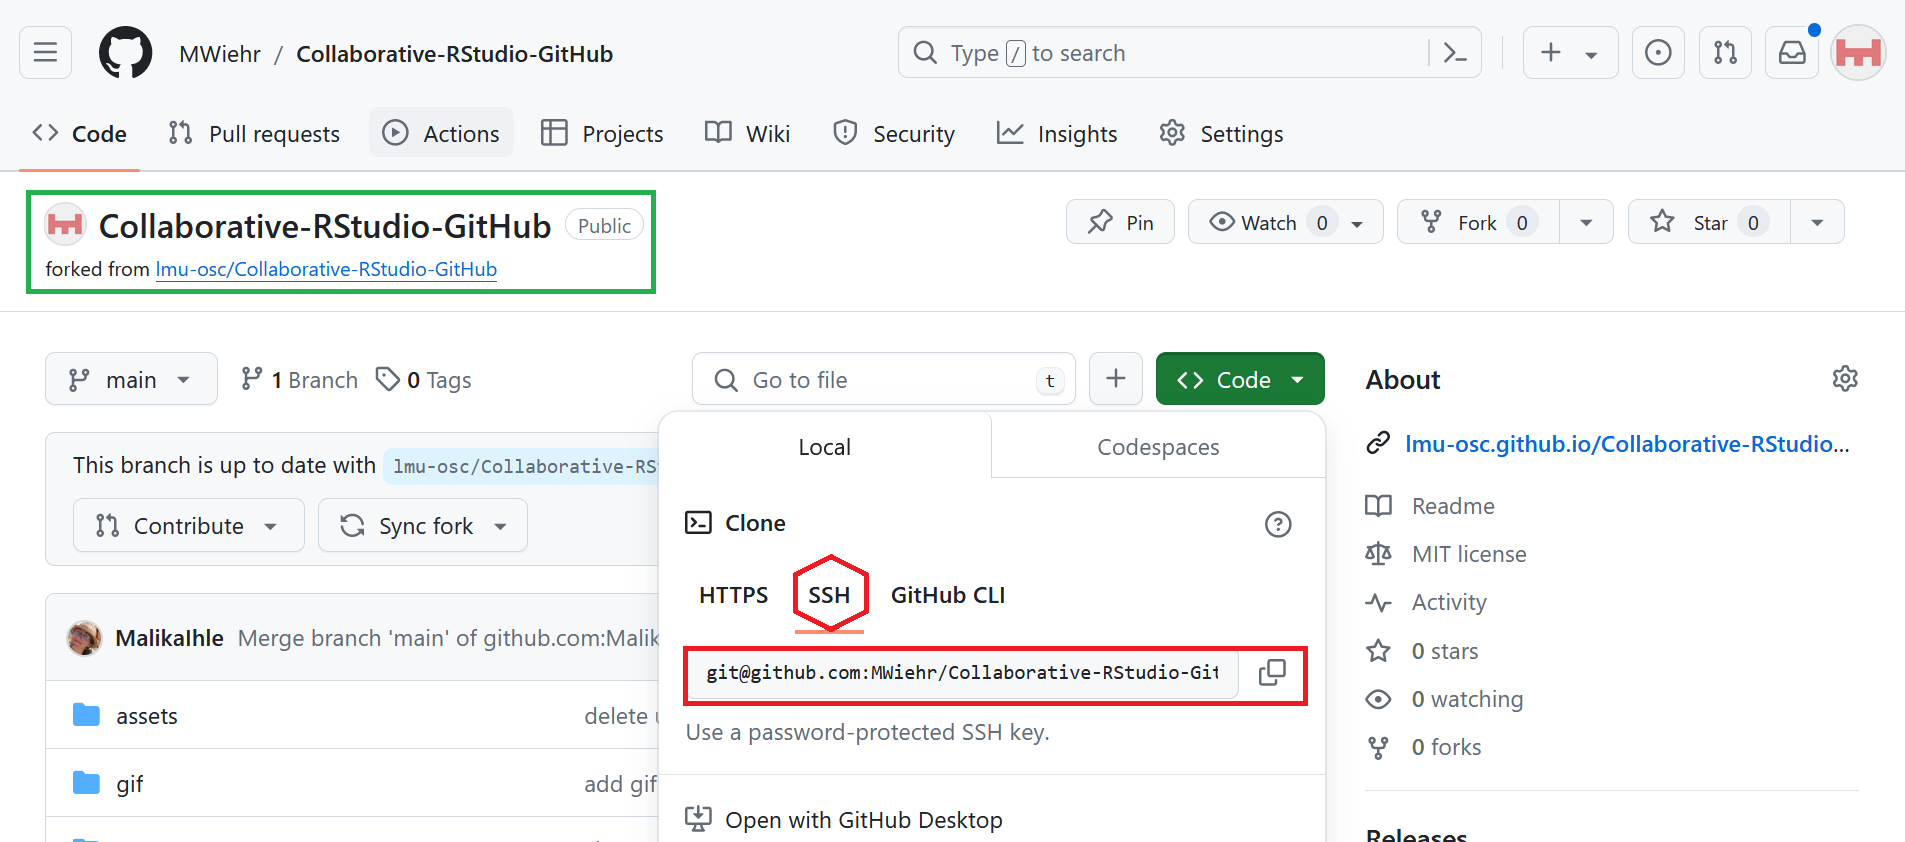
Clone a repo
To clone a repo means to copy the project files onto your local device, such as your personal computer.
Connects your local work directly to the team’s online repository.
Makes it easy to sync updates between contributors.
Important difference: Forking vs. cloning
When you fork the repo, a copy is made on your remote GitHub account. When you clone a repo, a copy is downloaded from GitHub onto your local device.
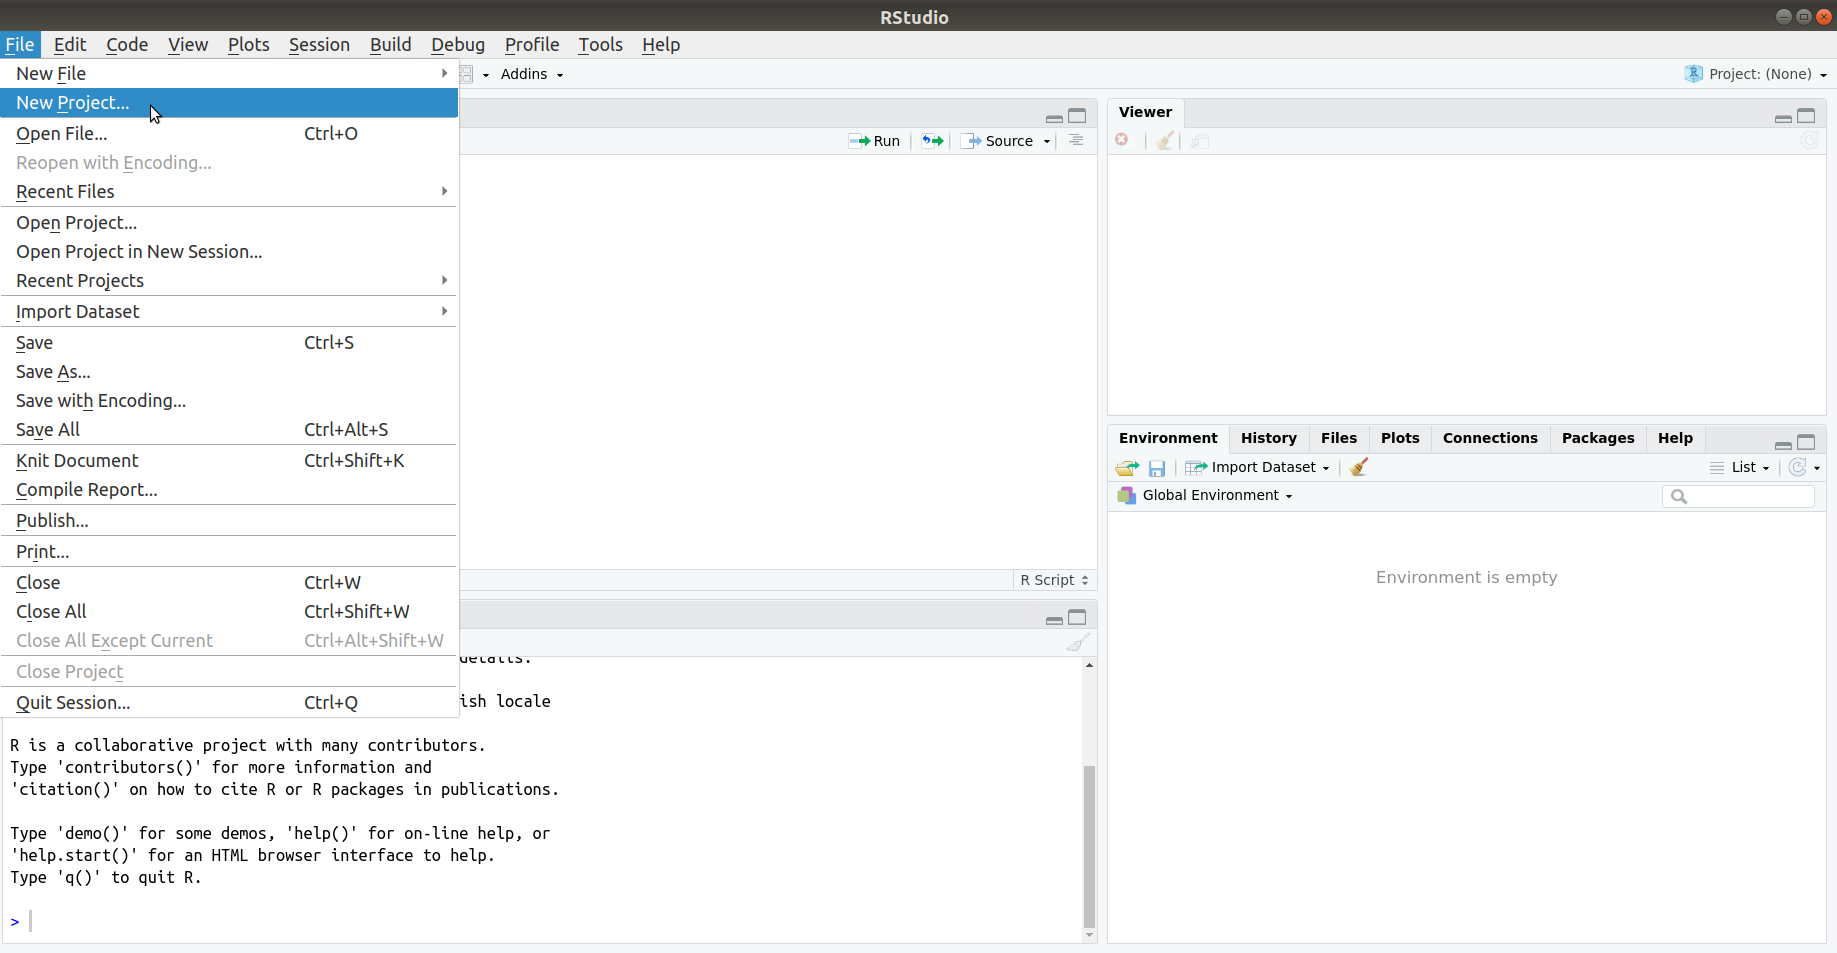
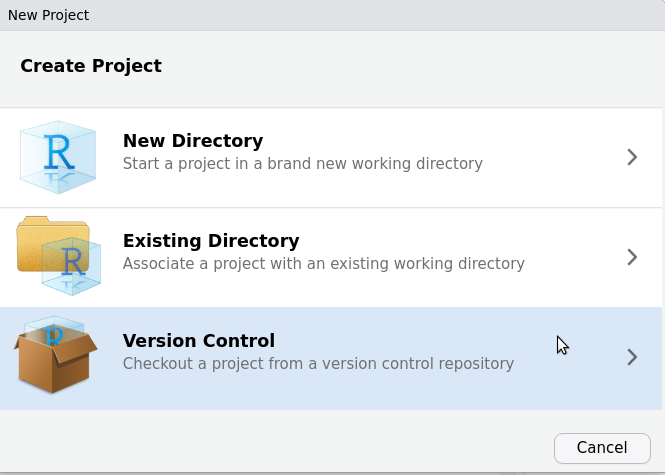
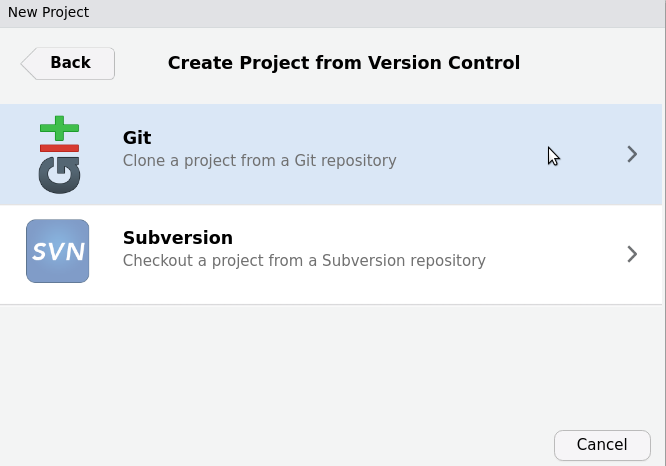
Practical exercise 2: Clone a repo
Practical exercise 2: Clone a repo
Practical exercise 2: Clone a repo
Practical exercise 2: Clone a repo
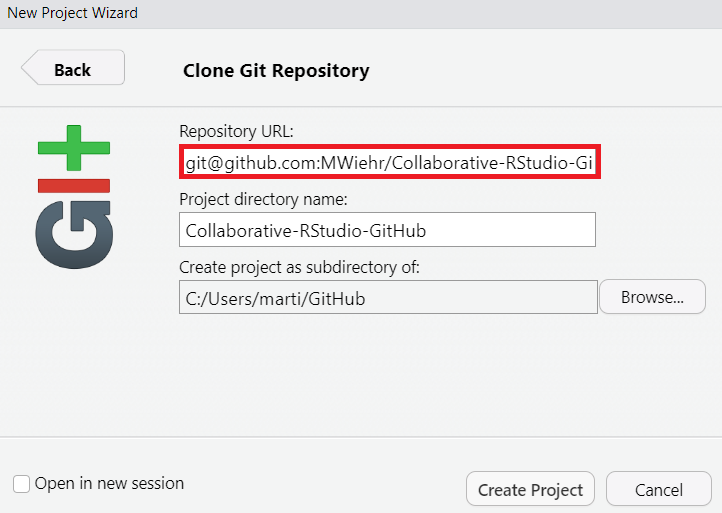
Placing this project in a new folder
First, make a new folder on your device. Then, you can change the path under “Create project as subdirectroy of:” to place this Git repository in that new folder. We are making a new folder because it is advisable that each folder has its own Git database.
Clone a repo
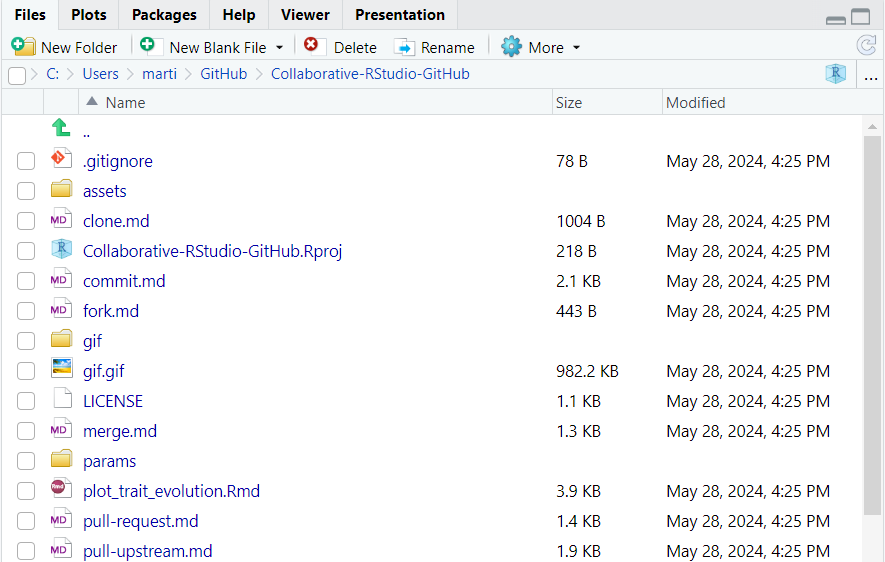
Now, when you click on the “Files” tab in RStudio, you should see all the files from the main repository.
Commit to a project
To commit to a project means to save the file with the changes you made locally in your version control system.
Records progress in small and trackable steps
Lets others see exactly what was changed
Makes it possible to revert or review changes if there are bugs
Avoiding merge conflicts
Merge conflicts happen when Git cannot automatically combine changes because the same part of a file was edited differently by two collaborators. Frequent commits help with resolving conflicts because they create clear checkpoints in your project’s history. GitHub also offers GitHub issues as a communication tool to resolve conflicts.
Practical exercise 3: Commit
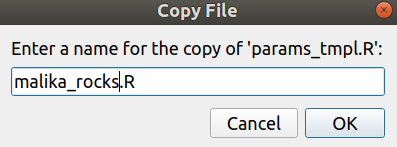
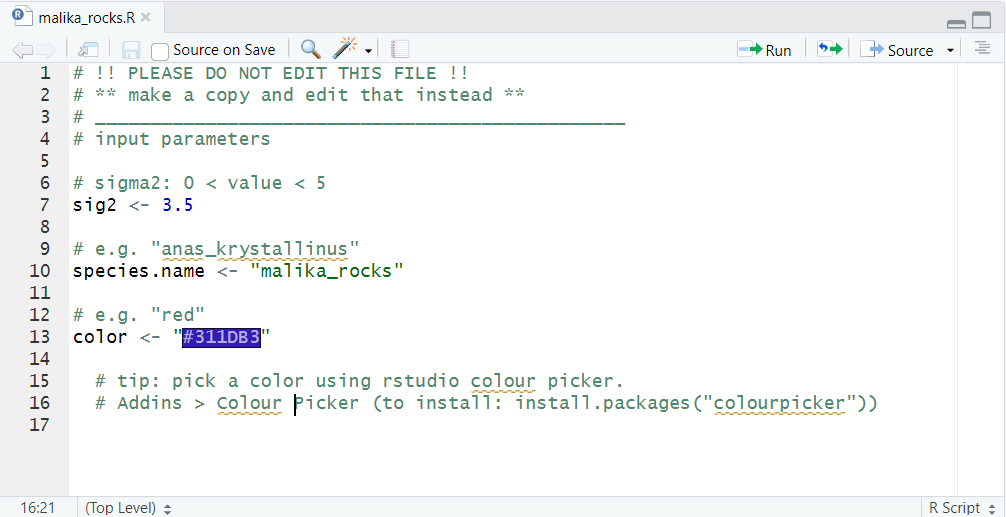
Before you commit to a project, you need to make some changes to the project.
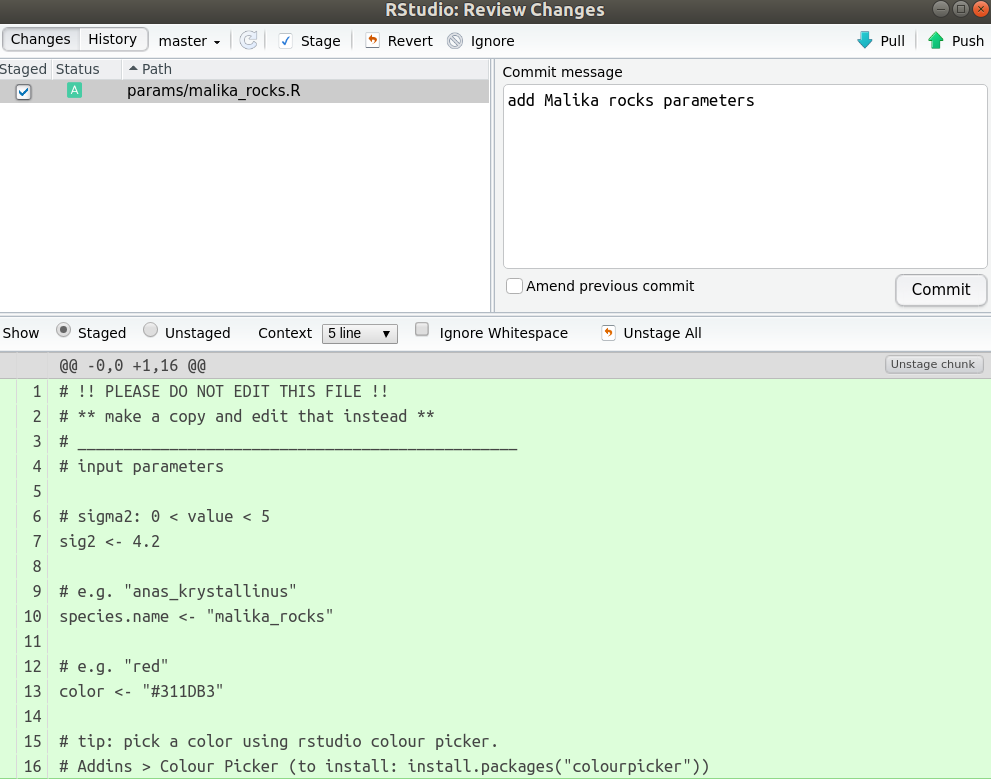
Practical exercise 3: Commit
Practical exercise 3: Commit
Practical exercise 3: Commit
Practical exercise 3: Commit
You made a contribution!
Great, now you have made changes! You added a file with your parameters on a shared project and committed it. Let’s take a minute (literally) and recap what you did to achieve that.
Activity: one-minute paper!
You have 60 seconds to write down what steps you took to collaborate on this project so far.
Think of the names of the actions, in which order you did them, and how can this be beneficial to you as a collaborator.
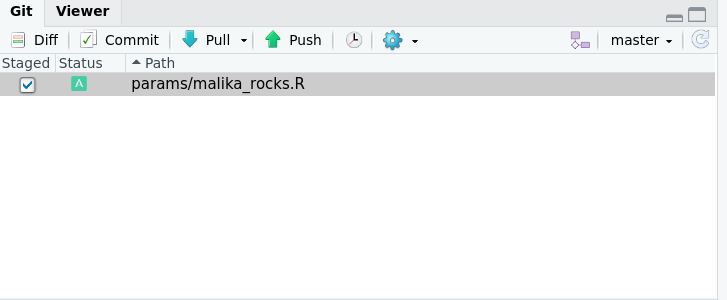
Push changes
To push changes means to upload your local commits from your local computer to the remote repository on GitHub.
Keeps the online version of the project up to date.
Makes your work visible to all contributors in real time.
Enables others to pull your latest edits and build on them.
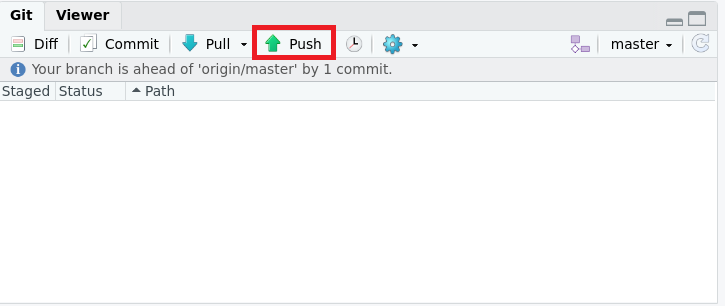
Practical exercise 4: Push
Push changes
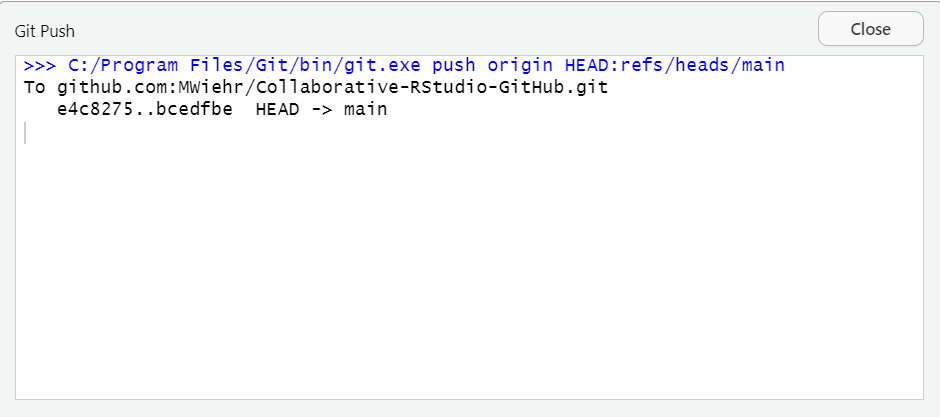
If you successfully pushed your changes, you would see a pop up box like the one below:
Push changes
Important step: refresh the page
Refresh the page of your forked repository on GitHub and you should see your new file with the commit message next to it. Refreshing the page is an important step to update your forked repository with the new file you added.
What is GitHub mainly used for by a team working on the same project?
Editing photos online
Hosting and collaborating on code or research projects
Sending emails and important messages to team members
Backing up personal files only
On GitHub, why would you fork a repository?
To delete the original repository and start a new one
To download a copy of the remote repository to your local computer
To create your own remote copy of someone else’s repository on GitHub
To merge your work into the main branch and have everyone’s work in one folder
What does it mean to clone a repository?
You download the repository from GitHub to your local device
You create a backup of your GitHub account
You make your repository private
You copy code into a new file then upload it to GitHub
When you make changes to a file then commit it, what happens?
It deletes all previous versions of your file
It sends your work directly to the main repository
It saves your changes locally (on your device)
It approves changes made by other collaborators
After I made changes and committed it, why would I then push the changes?
To create a new repository
To incorporate my changes into the files of the main repository
To notify my teammates that I made changes
To upload the work I saved locally to GitHub
Break! 15 minutes
Post-break quiz discussion
What do we see in the results?
Pull request
To make a pull request means asking the repository’s owner to review the changes you made (from your fork or branch) and merge them into the main repository on GitHub.
Creates a space for discussion and code review before incorporating changes.
Encourages feedback and peer learning.
Maintains project quality and consistency.
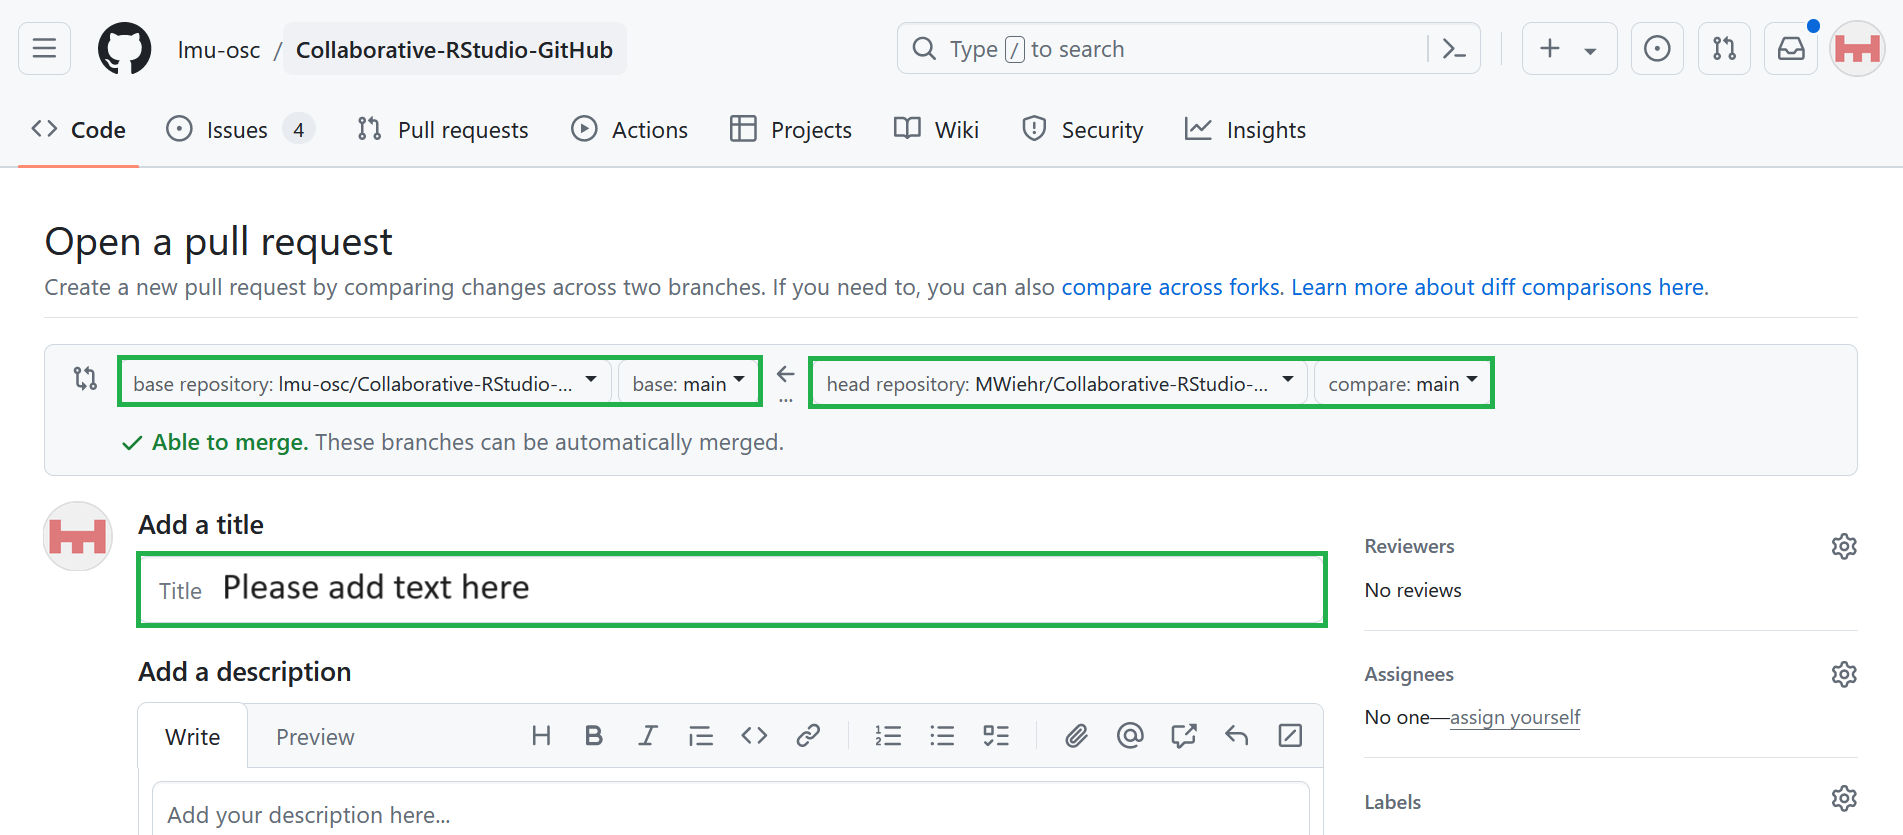
Practical exercise 5: Pull request
Practical exercise 5: Pull request
Practical exercise 5: Pull request
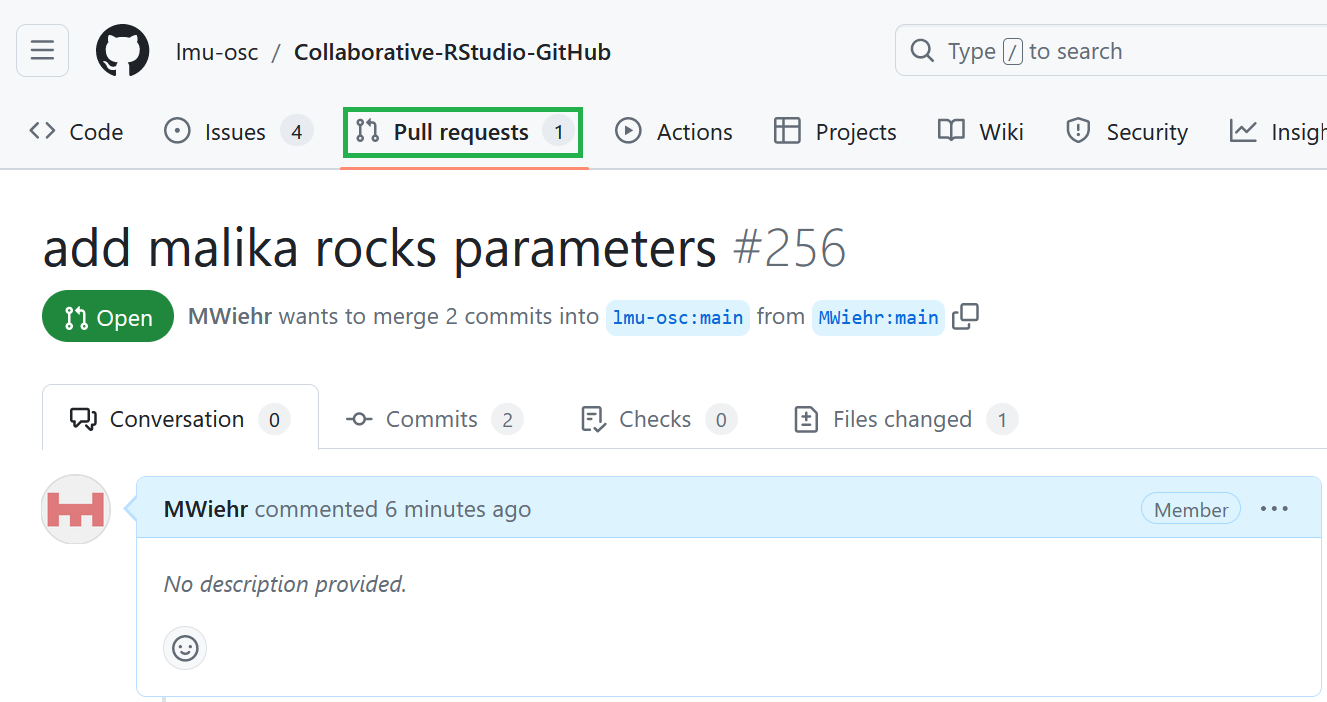
You should see a conversation tab around your pull request in the original repository.
Merge changes
To merge changes means to combine updates from different branches or contributors into one unified version of the project.
Brings everyone’s contributions together.
Ensures new work integrates smoothly with the main branch.
Helps resolve overlapping edits or conflicts between files.
How to merge changes
The owner of the main repository:
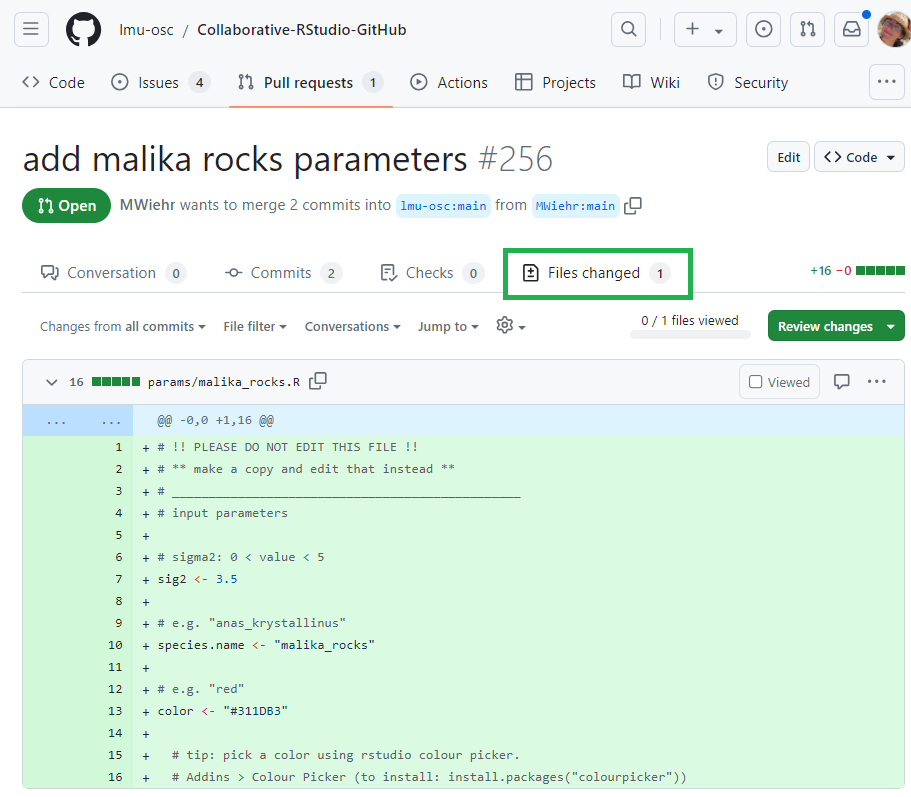
Goes to their “Pull requests” tab to inspect the changed files
Ensures that the parameters were inputted correctly so as to not break down their code down the line
What’s happening here?
In this example, the file “malika_rocks.R” is being reviewed to then be added to the “params” sub-folder in the main repository project files.
How to merge changes
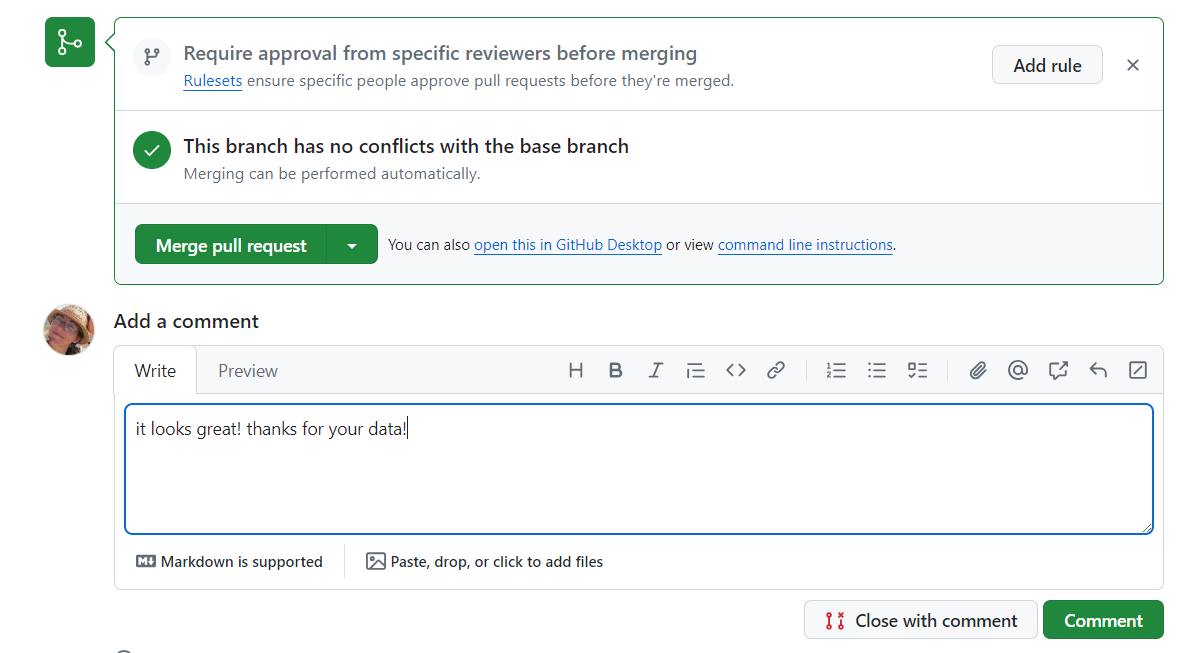
If everything looks fine, the owner will:
Go back to the “Pull request” tab
Write a comment
Merge the pull request and confirm the merge
How to merge changes
Now let’s see all the contributions work together!
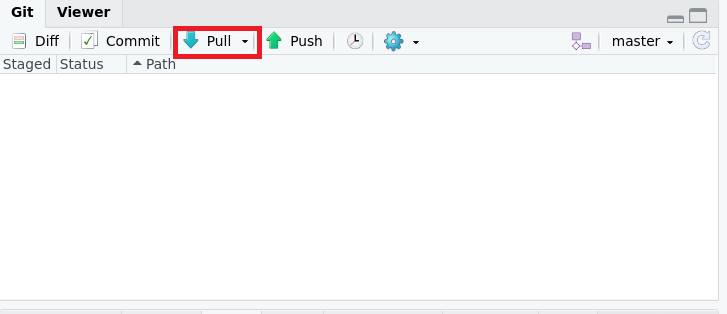
The owner of the main repository will pull the new contributed files from GitHub into their local repository using the “Pull” button in RStudio.
What should I see?
All the contributions that were merged into this repository should show up in the ‘Params’ sub-folder in the local repository.
How to merge changes
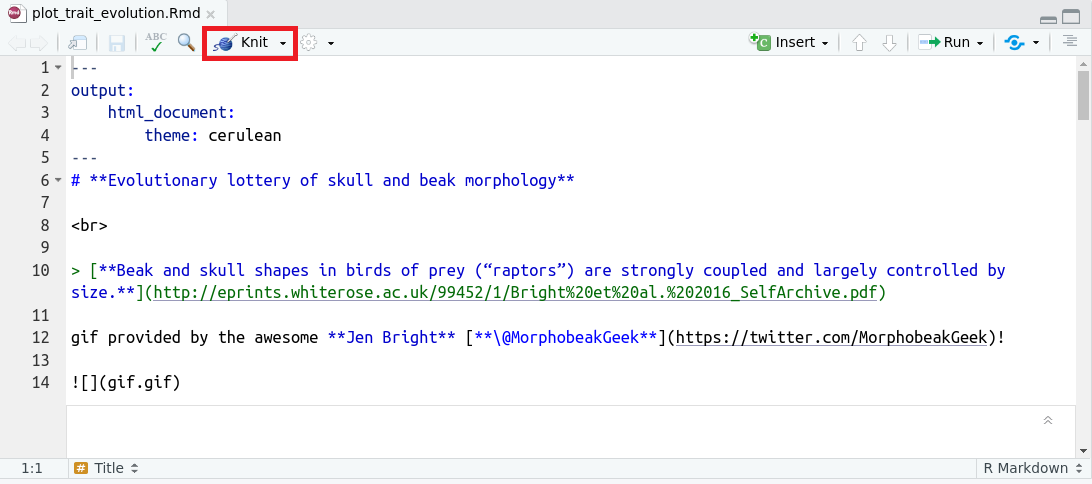
Then, the owner will locate and open the “plot-trait-evolution.Rmd” file in the repository which sources all the contributed files.
Once opened, they will click the “Knit” button on the toolbar to generate plots and figures based on the parameters that were contributed.
What does Knit do?
Knitting a Rmarkdown file means rendering the Rmarkdown code. This integrates the R code and Markdown code into a defined format (for example: an html file).
How to merge changes
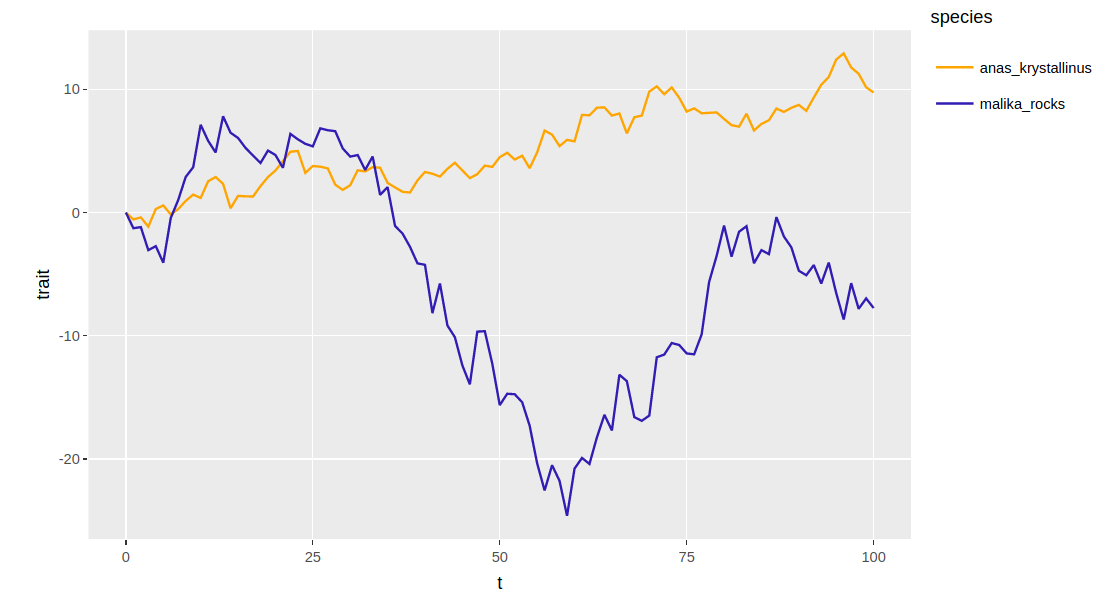
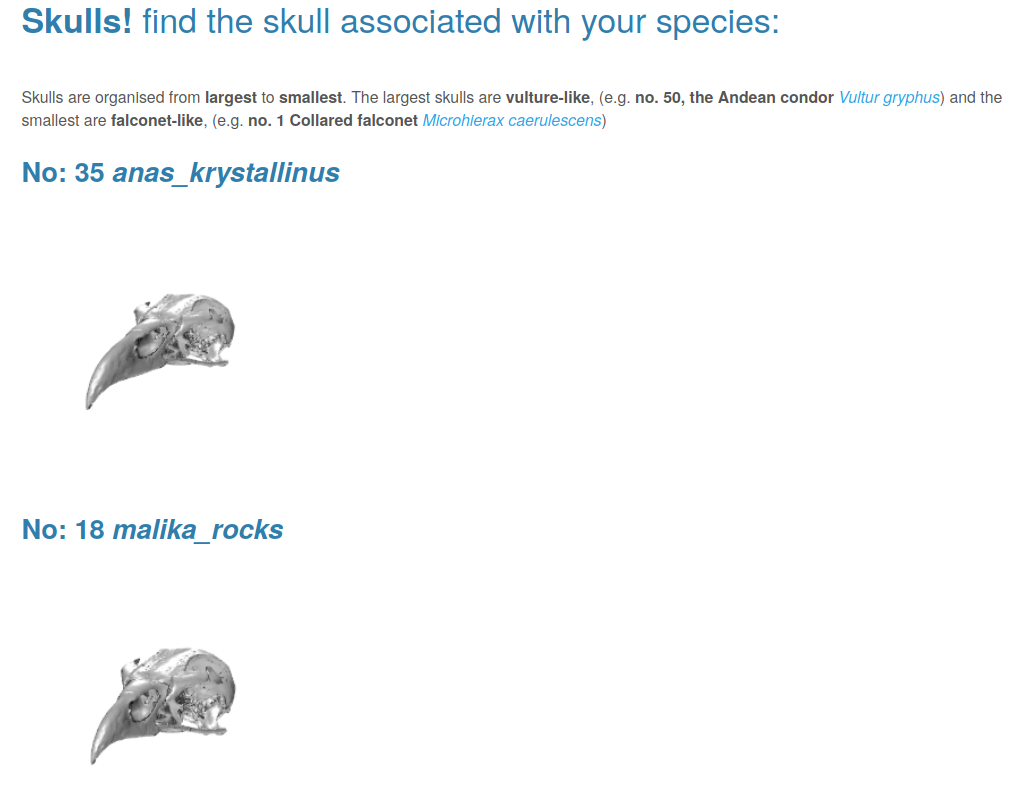
An html document will appear that shows the contributions plotted altogether on a line graph and images of skulls under the names of the species.
You did it! You collaborated on GitHub!
Merge changes - live demo!
Now let’s see what that looks like for this project with a live demonstration using your contributions!
Pull upstream
To pull upstream means to update your local or forked repository with the latest changes from the original (upstream) repository.
Keeps your local copy aligned with the main project’s progress.
Prevents outdated or conflicting edits when working in teams.
Encourages synchronization across all contributors.
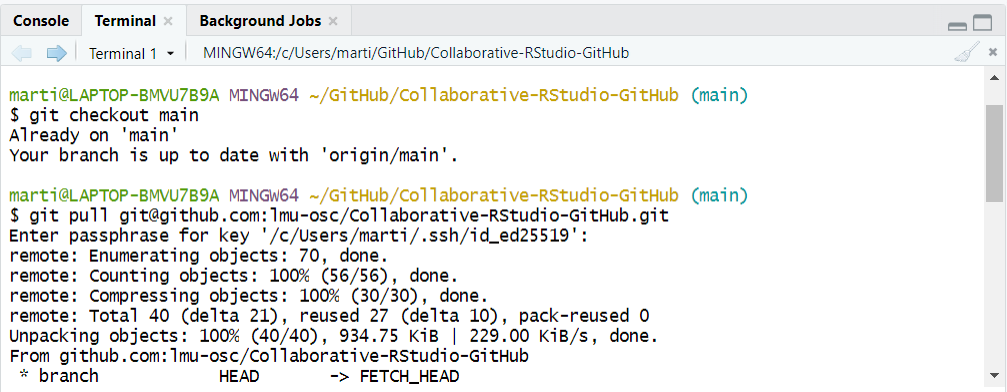
Practical exercise 6: Pull
git checkout main
git checkout
This command sets the branch to the one you want to pull the modifications from. In this case, you want to pull the changes from the main branch of the remote main repository into your the main branch of your local repository.
Replace the “ORIGINAL_OWNER” with the name of the GitHub account that owns the main repository. Replace “ORIGINAL_REPOSITORY” with the name of the main repository that has the original project files.
Practical exercise 6: Pull
This is an example.
Practical exercise 6: Pull
git push
This is an example.
And that is it!
You just completed the entire workflow!
You started with making a fork of the main repository with the project files to make your changes without affecting anyone else’s work.
Then you pushed and had these changes merged into the main repository.
Lastly, you pulled these changes so that your copies (remote and local) can stay updated with the changes made.
Recap
What actions did we learn in today’s lesson?
Fork a repo: make your own copy on GitHub
Clone the repo: bring it to your local computer
Commit: make changes locally
Push: upload those changes to your fork on GitHub
Pull request: propose those changes to the main/original repo
Merge: the project owner merges your pull request into the main branch
Pull upstream: after the merge, you pull the updated main branch from the original repo to sync your local copy
Recap activity
Remember this illustration?
Fill in the missing words with the actions we learned today!
Now that you have all gained some experience working collaboratively using GitHub, let us reflect with some questions:
1. How can collaborative coding with GitHub be useful?
2. What potential problems could still arise using this workflow?
Take-home message
Consider the following question:
If you had to explain to a new teammate why using GitHub for collaboration is valuable, what key ideas from today would you talk about?
Git from the terminal
Several actions in collaborative coding on GitHub can also be performed directly using Git commands in a so-called terminal instead of using the functions in RStudio.
What is a terminal?
It is a text-based tool where you can type commands to run programs such as Git. If you downloaded Git for Windows, you can right-click in a folder > Show more Options > Git Bash here to open Git Bash. On MacOS, you can use the built-in Terminal by going to Finder > Applications > Utilities > Terminal.
Assignment
Here is an activity sheet to learn and practice Git commands in the terminal:
Which of the following concepts or skills do you feel MOST confident about in relation to Git and GitHub? (Select all that apply)
Forking a repository and working on my own copy.
Cloning a repository from GitHub to my local machine.
Making commits and writing meaningful commit messages.
Pushing local changes to a remote repository.
Pulling or fetching updates from a remote repository.
I am still not sure about any of these concepts.
On a scale of 1 to 5, how comfortable are you right now with using Git and GitHub for collaborative coding and version control? (1 = Not comfortable at all, 5 = Very comfortable)
1
2
3
4
5
When you worked collaboratively on this GitHub project, what aspect did you find most challenging?
Understanding Git commands (commit, push, pull)
Remembering all the steps
Navigating the GitHub interface
Other
Discussion of survey results
What do we see in the results and how do they compare to the previous ratings?
One-Minute Paper is a quick reflective activity where learners spend about a minute writing brief responses to summarize what they learned. Check out the University of Rochester’s Teaching Center Page to learn more about it.
Pair theoretical aspects with practical exercises and group discussions according to the Think-Pair-Share style and according to Cognitive Load Theory (Sweller, 1980).
Additional related content
Here are some topics that are related to this session
GitHub Copilot is GitHub’s AI tool (developed with OpenAI) to assist developers by suggesting code, completing functions, and explaining snippets directly inside editors.
Attribution and license details UNFINISHED
This slide should contain information about the license and attribution details of this current set of slides.
The default for the created materials is CC-BY-SA 4.0
= Creative Commons license that allows others to share, adapt, and build upon the original work
only if they attribute the creator and also share their new work under the same terms
allows for both commercial and non-commercial use of the licensed material