Secure the connection between your computer and GitHub
When working with a GitHub repository, you’ll often need to identify yourself to GitHub using your username and password. However, since August 2021, higher security standards for this connection have become mandatory. Therefore, today we will use SSH keys to secure your identification to GitHub, as this is a common way to secure connections, which you may encounter again in other contexts in the future.
SSH keys come in pairs, a public key that gets shared with services like GitHub, and a private key that is stored only on your computer. If the keys match, you’re granted access.
The procedure below only needs to be executed once per GitHub account and for each computer you will use to connect to GitHub.
Generating an SSH key pair
SSH stores its keys in a hidden folder called .ssh inside your home directory. To see it, open a terminal — Git Bash on Windows, the Terminal app on macOS, or your distribution’s terminal emulator on Linux — and list its contents with ls:
ls ~/.sshThe ls command lists the contents of a directory. It’s fine if .ssh is empty or doesn’t exist yet–in that case, ls will either show nothing or present a message like No such file or directory. That’s expected: you’re about to create the folder by adding your first key to it.
In the command line of your terminal, type the following, replacing your_email@email.com with your own email address. Pay attention to spaces and capital letters!
# MAKE SURE TO REPLACE "your_email@email.com" WITH YOUR EMAIL ADDRESS
ssh-keygen -t ed25519 -C "your_email@email.com" -f ~/.ssh/github
This creates a new SSH key pair using the ed25519 algorithm, which is a modern and secure choice. The -C flag adds a label to the key with your email address, and the -f flag specifies the file name for the key pair.1
You will then be asked to provide a passphrase. This is the prompt that will appear:
Enter passphrase (empty for no passphrase):
Enter same passphrase again:
Protecting your keys with a password is optional, and recommendations are mixed on whether or not to do this. For the sake of convenience in this tutorial, we do not recommend using a passphrase, in which case you can just hit ENTER twice to skip this step.2
When the key generation is complete, you should see a confirmation that looks like this (the exact characters may be different for you):
Your identification has been saved in /Users/username/.ssh/github.
Your public key has been saved in /Users/username/.ssh/github.pub.
The key fingerprint is:
SHA256:6nr/zo0g7Bz7WMRwy34maBhQy1UZyX47gT+egRdlIhs your_email@email.com
The key's randomart image is:
+--[ED25519 256]--+
|    .o++         |
|   o oF . o      |
|  . o+ =.+.      |
|   .  + += .     |
|    .  +S++      |
|   . ..oB=       |
|    . ++*=.      |
|     o.==* o     |
|    .o.o+** .    |
+----[SHA256]-----+
Check the contents of the .ssh/ folder again:
ls ~/.sshYou should now see at least these two files:
github
github.pub
Creating the SSH config file
Because you saved your key with a custom name (github), SSH won’t automatically know which key to use when connecting to GitHub. To fix this, we need to create a configuration file. This file tells the SSH software which key to use when connecting to GitHub. In the command line of your terminal, type the following command:
# Create the SSH config file
touch ~/.ssh/config
Within this config file, we will need to add some lines specifying the host (GitHub) and the identity file (your private key). To do this, run the following command to insert the lines into the config file:
# Add the following lines to the SSH config file
echo -e "Host github.com\n\tIdentityFile ~/.ssh/github" >> ~/.ssh/config
# Check the contents of the config file with cat
cat ~/.ssh/config
Formatted, the text in the config file should look like this:
Host github.com
    IdentityFile ~/.ssh/github
Adding a new SSH key to your GitHub account
We now need to tell GitHub about your public key. Display the contents of your new public key file with cat. Please type the command below exactly as it is, in its entirety:
# Run this code
cat ~/.ssh/github.pub
Be careful: do not copy the content of your private key, but your public key. Your public key ends with .pub.
The output should look something like this:
# The output looks like this. The characters after ssh-ed25519 will be different for you, however.
ssh-ed25519 AAAAC3NzaC1lZDI1NTE5AAAAIFEKiimOpcayfHhlbjmnIBAUX74FY/o20k9yFA16XOLm your_email@email.com
Copy the contents of the output to your clipboard.
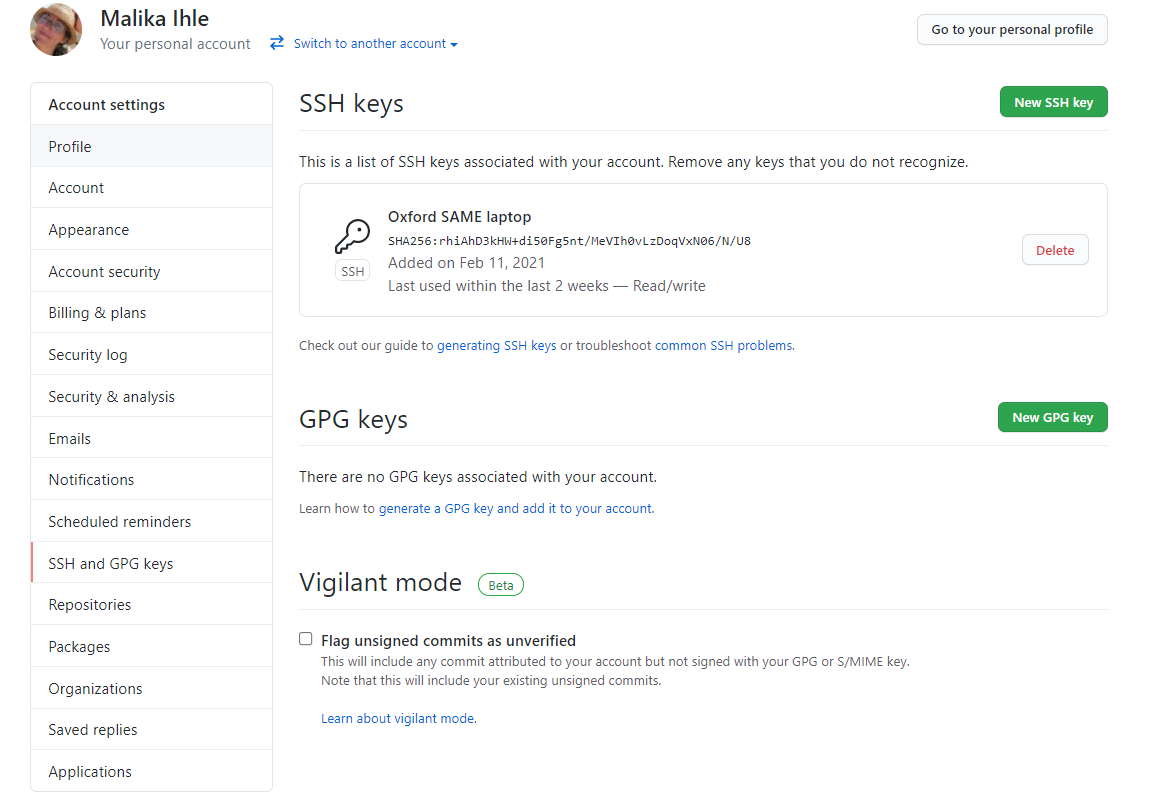
Login to github.com and bring up your account settings by clicking on your profile photo (top right) and selecting Settings. Click on SSH and GPG keys (left sidebar), and then click on the green button ‘New SSH key’ or ‘Add SSH key’.
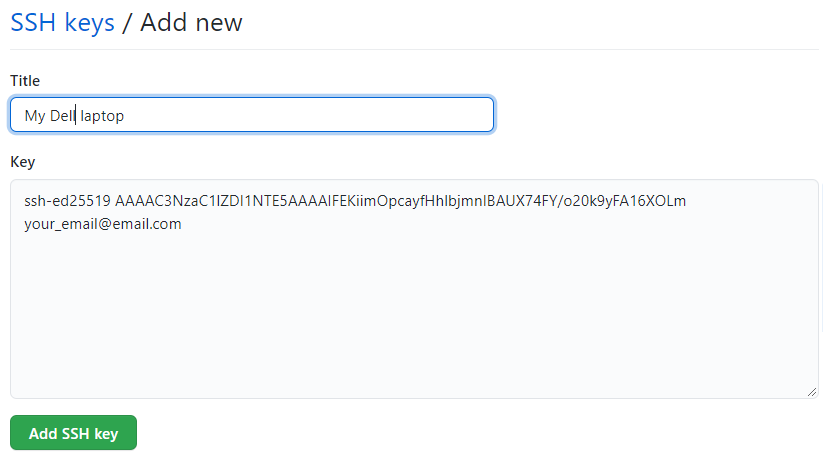
In the “Title” field, add a descriptive label for the new key, e.g. something that would identify the device you just connected. For example, if you’re using a personal laptop, you might call this key “Personal MacBook Air”. Finally, paste the contents of your clipboard into the Key text box and hit the green ‘Add key’ button to save. Enter your GitHub password if prompted.
Testing your connection to GitHub
(These instructions are a slightly abbreviated version of the page here: https://docs.github.com/en/authentication/connecting-to-github-with-ssh/testing-your-ssh-connection)
Finally, we can “ask” GitHub at the command line if our connection is acceptable with the following code:
ssh -T git@github.com
# Attempts to SSH to GitHub
You will likely be asked about “fingerprinting” to which you can type yes, fingerprinting is okay, and press Enter. You should then receive a message like this:
> Hi USERNAME! You've successfully authenticated, but GitHub does not
> provide shell access.
That’s it!
Going forward, you can use the SSH URL when cloning a repo to your local machine (we will cover this terminology and steps in the second tutorial). You are completely done with the setting up part, which you will need to repeat only if you change computer.
Let the fun begin!
Footnotes
The
-fflag is optional. If you omit it, the key pair will be created in the default location, which is~/.ssh/id_ed25519for the private key and~/.ssh/id_ed25519.pubfor the public key. However, we recommend using a descriptive name for your key pair, especially if you plan to use multiple keys for different purposes.↩︎If you do choose to use a passphrase, make sure to remember it, as you will need it each time you use the key. When you type passwords in the command line, nothing is displayed, not even the stars/asterisks, i.e. ***.↩︎