Introduction to version control with Git in RStudio
LMU Open Science Center
06/07/2026
Licence
This work was originally created by Mike Croucher under a CC-BY-SA 4.0 Creative Commons Attribution 4.0 International License. It was subsequently adapted by Malika Ihle during her time at Reproducible Research Oxford. This current work by Sarah von Grebmer zu Wolfsthurn, Peter Edelsbrunner, Felix Schönbrodt and Malika Ihle is licensed under a CC-BY-SA 4.0 Creative Commons Attribution 4.0 International SA License. It permits unrestricted re-use, distribution, and reproduction in any medium, provided the original work is properly cited. If you remix, transform, or build upon the material, you must distribute your contributions under the same license as the original.
Code snippets are dedicated to the public domain and licenced under a CC0 1.0 Creative Commons Universal Licence. You may use, modify, distribute, and sell the code snippets for any purpose, without permission or attribution. The code snippets are provided “as is”, without warranty of any kind.
Any remaining questions about the most recent content and/or practical exercises?
Where are we at?
Previously:
Familiarization with the basics of R
More advanced R skills: data manipulation, reshaping, functions, plotting
Using R for your own scientific work
Up next:
Facing challenges in our workflow and how to solve them
Enhancing reproducibility and our own accountability
Facilitating collaboration
Learning goals
Understand the problem(s) that can be solved by version control
Install and configure Git
Set up the connection between your computer and GitHub
Create an RStudio Project under version control for a reproducible workflow
Make changes within RStudio and commit changes locally
Connect local and remote repositories for your work
Key terms and definitions
Reproducible workflows:
RStudio Project:
Git:
GitHub:
Repositories:
Key terms and definitions
Reproducible workflows: Structured process ensuring that the methods can be consistently repeated by others using the same approach, data and tools
RStudio Project: A way to store all files related to one R project in one place (R scripts, files, workspace, history, …) via a so-called .Rproj file
Git: Version control system that tracks and manages changes to files and code (an open source tool)
GitHub: Cloud-based version control platform for hosting Git repositories which includes collaboration features (a free but commercial platform owned by Microsoft)
Repositories: Git terminology for a folder where the contents of the folder are being tracked by Git
Some realistic challenges in our (study and work)lives …
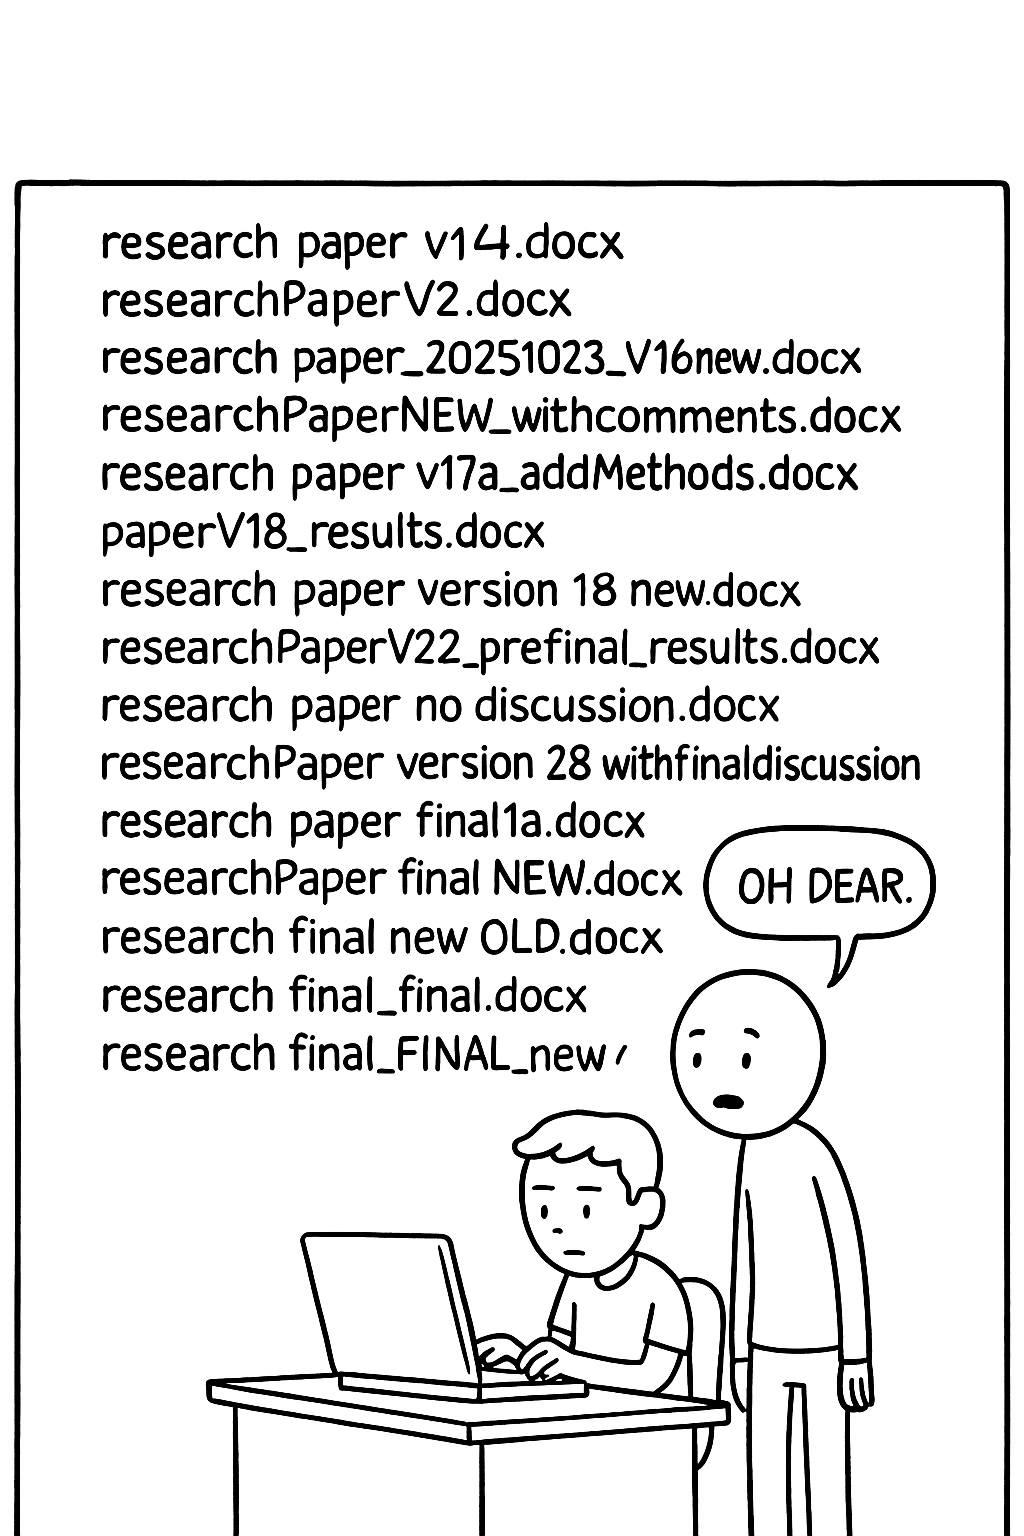
Challenge 1: Document and project management
Multiple versions of the same project/document “floating” around on your PC.
Sound familiar?
What is your current document naming and management strategy?
Challenge 2: When hardware fails
Laptop dies, files are accidentally deleted.
Note
Mentally raise your hand if this happened to you before.
Image created with generative AI.
Challenge 3: “What on earth did I do again..?”
Projects evolve, it is easy to forget what we last changed or did on the project.
Image created with generative AI.
Challenge 4: “But I just wanted to try to …”
Especially with coding, trying new ideas can break your code.
Image created with generative AI.
Who is familiar with these problems?
Inconsistent data and file management aka I cannot find my files
Hardware failures (coffee spill, laptop dropped, lost laptop, broken USB) aka my work is lost
Extended periods of time between project actions aka I forgot what I was working on
Experimentation with new features aka I tried something and my laptop is now smoking
All of the above
None of the above (are you sure?)
A realistic solution to these challenges?
Version control
“Version … what?”
Version control = system that records changes to files over time by recording the difference between two files
Tracks modifications and edits
Helps you manage different versions
Allows you to recover previous versions
Before we start: Survey time!
What is your level of familiarity with version control?
I have never heard of it before.
I have heard of it but have never worked with it.
I have a basic understanding and some experience with it.
I am very familiar and have worked with it extensively.
Which of the following concepts or skills do you feel confident in? (Select all that apply.)
Git
GitHub
Repositories
RStudio Project
I am not sure about any of these concepts.
How comfortable are you with using Git for version control?
1 = Not comfortable at all
2
3
4
5 = Very comfortable
Discussion of survey results
What do we see in the results?
Git: What is it?
Git is a free and open source software. With Git, you can:
Track changes to files across folders over time, seeing what was changed, when and by whom
Collaborate efficiently within a team as multiple people can work on the same folders and files
GitHub: What is it?
GitHub is a cloud-based version control platform that uses Git to track changes and hosts Git repositories.
Allows multiple people to collaborate on the same project
Collaborators can share repositories, code etc. and ask for feedback, initiate discussions and point out bugs and issues
GitHub stores all files remotely, making it accessible from anywhere
Note
GitHub is a free but commercial platform owned by Microsoft. A similar functionality is provided by GitLab, Codeberg, and other providers; some of them open source and non-commercial.
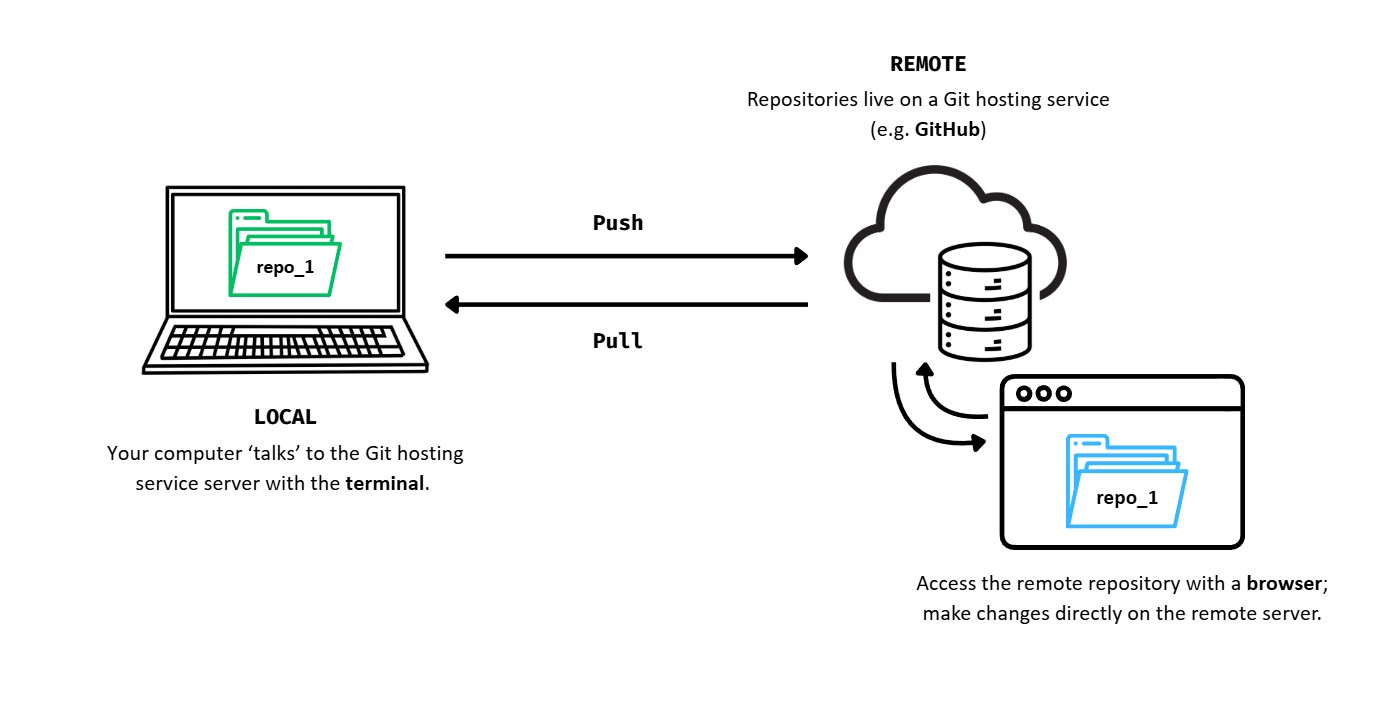
The Git - GitHub workflow
#explainlikeIamfive
In pairs, explain the Git - GitHub workflow to your partner. What is the difference between pushing and pulling?
What is a “Git Forge”?
Git handles version tracking locally and across repositories.
A git forge adds a web-based layer and collaboration features on top of Git, such as:
Access control (permissions, teams)
Pull/Merge requests (propose and review changes)
Issue tracking (bug reports, tasks)
Code review tools (comments, approvals)
CI/CD integration (automated testing and deployment)
Web interface (browse code, history, diffs)
Note
Git = the engine that tracks changes Git forge = the full collaboration platform built around that engine (GitHub, GitLab, Codeberg, …)
How to use Git: Let’s git started!
Some key terms
Terminal = an interfaced used to interact with the operating system, from which we can run programs, execute commands and “tasks” for the operating sytem and manage files (e.g., rename or remove them)
Securing the connection between your computer and GitHub
You need to identify yourself and your machine to GitHub before interacting with GitHub repositories.
SSH keys are a common way to manifest your identification to GitHub
Important
SSH keys come in pairs, a public key that gets shared with services like GitHub, and a private key that is stored only on your computer. Never share your private key!
If the keys match, you’re granted access. Setting up the SSH key has to be executed once per GitHub account and for each computer you will use to connect to GitHub.
Checking for existing SSH key pair
Step 1: Before generating a new SSH key pair, check for existing keys in your .ssh directory.
Windows: Open Git Bash (Windows start menu > type Git Bash into search bar)
MacOS: Open Terminal App
Linux: Open your distribution’s (or any other) terminal emulator
Checking for existing SSH key pair
Step 2: Enter the following command to list the content of the ssh directory:
Terminal
ls ~/.ssh
A Note for Nerds
ls = “list” files in a directory
~ = home directory of the current user
.ssh = folder where SSH keys are stored
Checking for existing SSH key pair
Step 3: If there are existing ssh keys, they are named like this (you can have multiple keys):
id_rsa.pubid_ecdsa.pubid_ed25519.pub
Important
If you already have an SSH key pair, you can skip the section on how to generate a new SSH key pair. If you don’t have an existing public and private key pair (which is to be expected!), or if you receive an error that ~/.ssh doesn’t exist, that this file location doesn’t exist, or that you can’t access this folder, go ahead and generate a new SSH key pair.
Generating a new SSH key pair
Step 1: In the command line, type the following (replacing the email here with your own email) to create a new SSH key pair with your email as a label:
Terminal
ssh-keygen-t ed25519 -C"your_email@email.com"
Tip
Pay close attention to spacing and capital letters while typing.
Generating a new SSH key pair
Step 2: When prompted to Enter a file in which to save key, press ENTER to accept the default file location. That should give you this prompt:
Terminal
Generating public/private ed25519 key pair.
Enter file in which to save the key (/Users/username/.ssh/id_ed25519):
Generating a new SSH key pair
Step 3: Next, you are asked to provide a passphrase in the terminal (see the next slide for more information!).
Terminal
Enter passphrase (empty for no passphrase):
Enter same passphrase again:
Warning
When you type passwords in the command line, nothing is displayed, you are however still typing in the background. This is normal behaviour by the command line.
Some notes on passphrases …
Note
Creating a passphrase is an optional extra-layer of protection, as it protects your keys with a password. However, you will need to type that password everytime you use your SSH key, which can get annoying. In a high-security environment, add a passphrase. For typical research use cases, you can skip that step (simply press ENTER without adding a passphrase).
Important
If you lose your SSH key passphrase, there is no way to recover it. You’ll need to generate a brand new SSH keypair. Therefore, when you create your passphrase for your ssh key, please write it down immediately so that you do not forget, ideally in a password manager.
Generating a new SSH key pair
Step 4: When the key generation is complete, you should see the confirmation below.
Terminal
Your identification has been saved in /Users/username/.ssh/id_ed25519.Your public key has been saved in /Users/username/.ssh/id_ed25519.pub.The key fingerprint is:SHA256:6nr/zo0g7Bz7WMRwy34maBhQy1UZyX47gT+egRdlIhs your_email@email.comThe key's randomart image is:+--[ED25519 256]--+| .o++ || o oF . o || . o+ =.+. || . + += . || . +S++ || . ..oB= || . ++*=. || o.==* o || .o.o+** . |+----[SHA256]-----+
Generating a new SSH key pair
Note
Done! You have successfully generated your public SSH key pair.
Adding the SSH key to GitHub account
Step 1: Tell GitHub about your new public key. In the terminal, please hit ENTER after typing:
Terminal
cat ~/.ssh/id_ed25519.pub
Important
Be careful: do not copy the content of your private key, but your public key. Your public key ends with .pub.
Adding the SSH key to GitHub account
Step 2: The output should be something like below. This is the output that needs to be copied in its entirety.
Terminal
# The output looks like this. The characters after ssh-ed25519 will be different for you, however.ssh-ed25519 AAAAC3NzaC1lZDI1NTE5AAAAIFEKiimOpcayfHhlbjmnIBAUX74FY/o20k9yFA16XOLm your_email@email.com
Important
Copy the contents of the output to your clipboard.
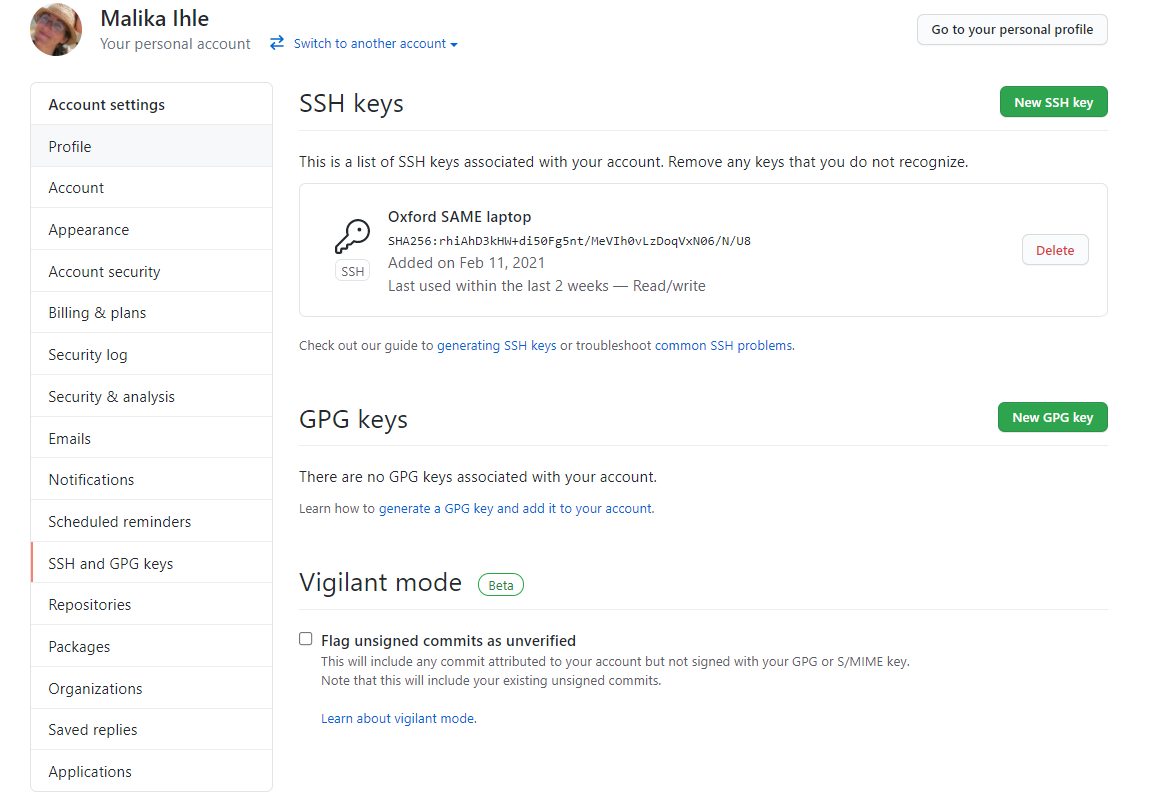
Navigate to your account settings by clicking on your profile photo (top right) and selecting Settings
Click on SSH and GPG keys (left sidebar)
Click on the green button New SSH key or Add SSH key.
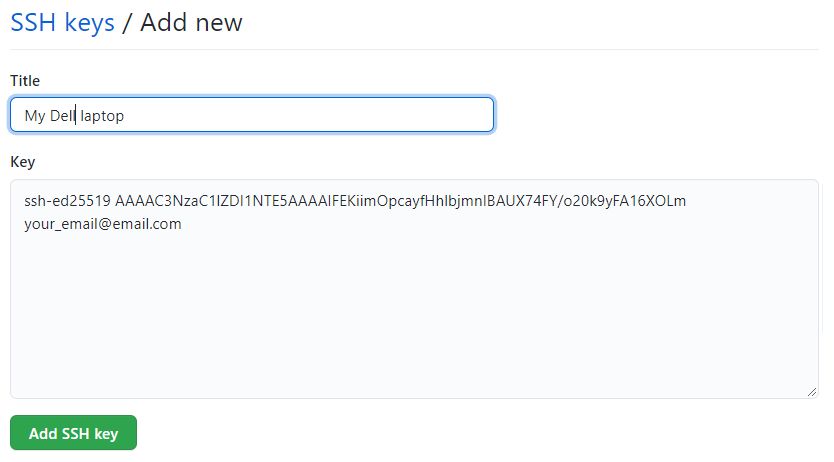
Adding the SSH key to GitHub account
Step 4:
In the Title field, add a descriptive label for the new key, e.g. something that would identify the device you just connected
For example, if you’re using a personal laptop, you might call this key “Personal MacBook Air”.
Paste the contents of your clipboard into the Key text box
Hit the green Add key button to save. Enter your GitHub password if prompted.
Adding the SSH key to GitHub account
Step 4: continued
Adding the SSH key to ssh-agent
(optional step, only necessary if you keep getting asked for your key)
Managing your ssh keys is done via the ssh-agent software.
Note
Depending on your system, the following might not be necessary. On most GNU/Linux distributions and MacOS, your key will be automatically added to the ssh-agent after the first time you enter it.
Only if you keep getting asked for your key each time you want to clone or push to a GitHub repository, you can follow the instructions on the next slides.
Step 1: In the command line, start the ssh-agent with this command:
Terminal
eval"$(ssh-agent-s)"
This should give you this:
Agent pid 59566
Adding the SSH key to ssh-agent
Step 2: Add your SSH key to the ssh-agent by typing the entirety of this command:
Terminal
ssh-add ~/.ssh/id_ed25519
Testing the GitHub connection
Step 1: “Ask” GitHub at the command line if our connection is accepted with the following code:
Terminal
ssh-T git@github.com
Testing the GitHub connection
Step 2: When asked about fingerprinting, type yes, then press ENTER to receive this output:
Terminal
> Hi USERNAME! You've successfully authenticated, but GitHub does not> provide shell access.
This is it!
You have set up a new SSH key pair and successfully let GitHub know your identity to connect your computer to your GitHub account. These steps will only have to be repeated when you change computers. Let the fun begin!
RECAP: Setting up Git
What have we done so far?
Installed Git ✅
Configured Git ✅
Secured a connection between PC and GitHub via SSH key pair ✅
Added SSH key pair to GitHub account ✅
Tested the connection between your machine and GitHub ✅
Ready!
Your Git and GitHub setup is now secure and ready to use!
Pre-break survey
Brief check-in: Your Turn!
What is the main purpose of using Git in a project?
To edit code directly on GitHub
To automatically test and debug programs
To track changes and collaborate on code with version control
To back up files to the cloud without version history
Why do we add an SSH key to our GitHub account when setting up Git?
To store our Git username and password on the computer
To allow our computer to connect securely to GitHub without entering a password each time
To make Git automatically commit our changes
To enable GitHub to edit our files directly on our computer
Break! 15 minutes
Post-break survey discussion
What do we see in the results?
RStudio Project: What is it?
Local folder used to organize your work within a self-contained R storage.
Contains all files related to project: R scripts, source files, location of the R working directory, RStudio workspace …
Includes shortcut to open the project directly in RStudio
Creating an RStudio Project
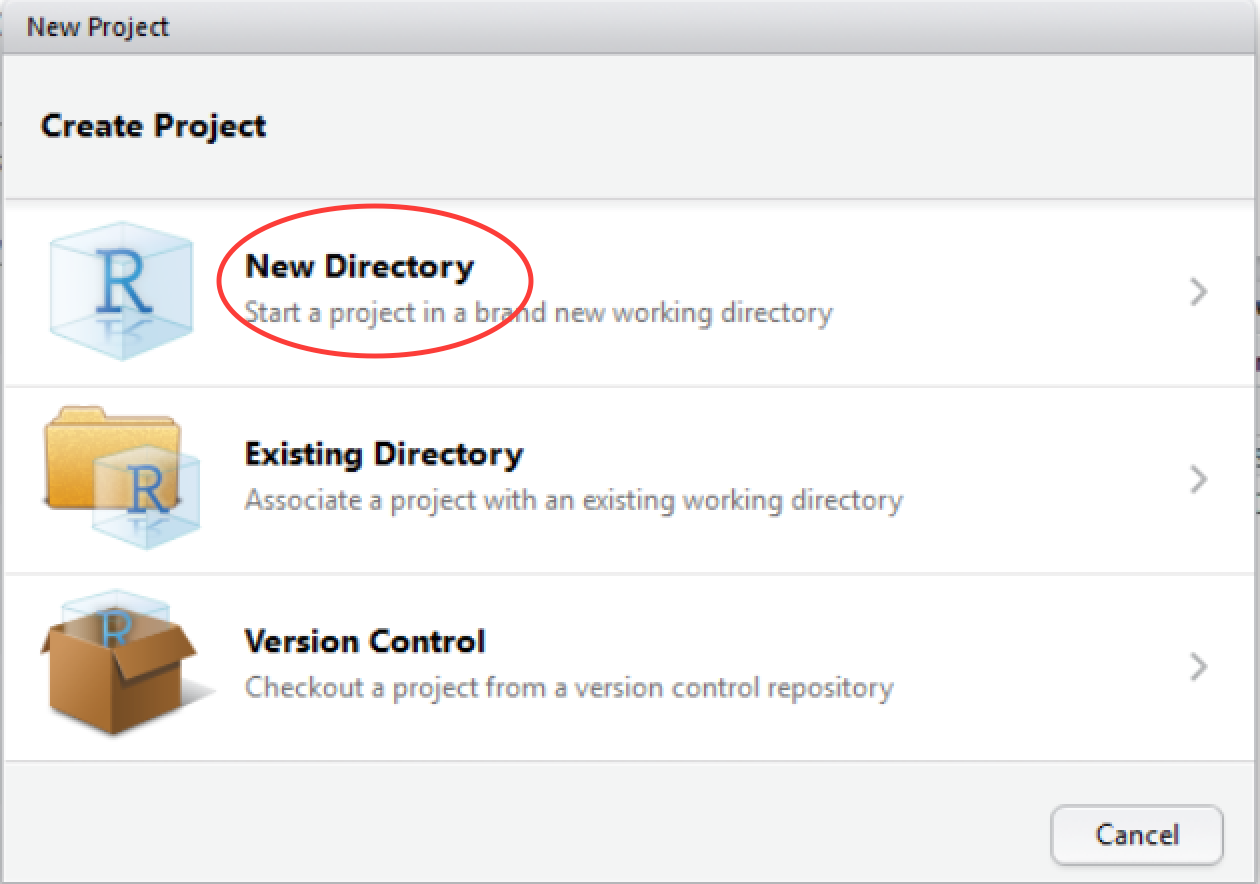
Step 1: Create a new project in RStudio as follows: File> New Project > New Directory
Creating an RStudio Project
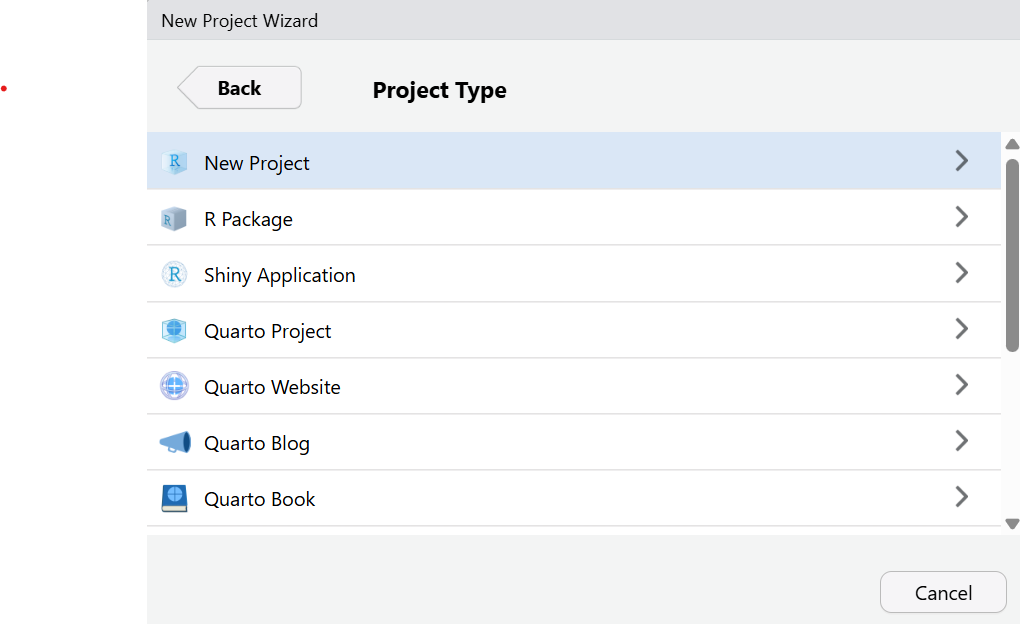
Step 2: In the New Project Wizard screen, click on New project:
Creating an RStudio Project
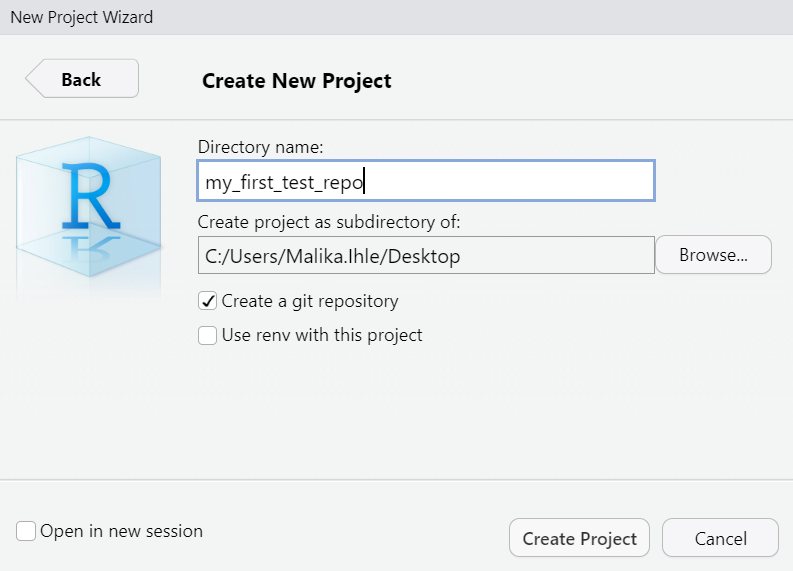
Step 3: Give your project a name (e.g.’my_first_test_repo’) and ensure that Create a git repository is ticked. Next, click on Create Project.
Note
RStudio will create a new folder containing an empty project and set it as the new R working directory.
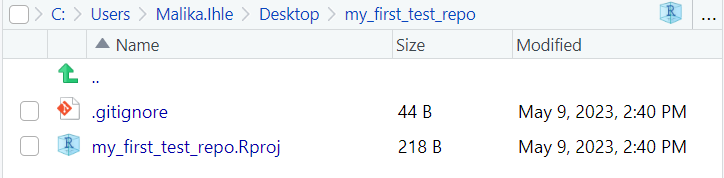
Creating an RStudio Project: Important files
Two files are created in the otherwise empty project:
.gitignore: Specifies files that should be ignored by the version control system (e.g. sensible data files that should not be made public, or documentation that you don’t need version controlled).
my_first_test_repo.Rproj: Configuration information for the RStudio project.
Setting up a small practice project
We will now generate a small project to practice version control on.
Step 1: Download dataset to practice analyses on.
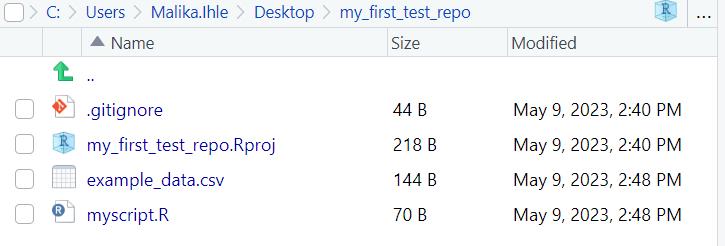
Setting up a small practice project
Step 2: Create a new R script File > New File > R script and save it as myscript.R. Then add the code below to your R script.
Step 3: Run the code and check your directory. It should now contain four files:
Getting your project under version control: Key concepts
Before we do the first action, one orientation point:
The Git pane in RStudio is your control center for version control
It shows which files changed and what Git knows about them
This is where you stage, commit, review history, and sync with GitHub (all actions will be explained in the following slides)
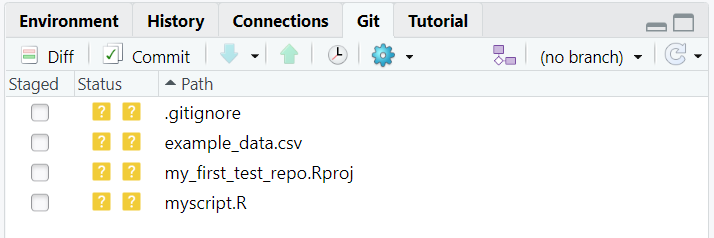
Getting your project under version control
Step 1: Find the git version control pane in the top right corner of RStudio in the Git tab.
Getting your project under version control: Key concepts
Before we click anything, two terms matter:
Untracked = a file exists, but Git is not yet tracking its versions
Staged = changes are selected and prepared for the next commit
Think of staging as choosing what goes into your next snapshot
Getting your project under version control
Step 2: Hover the mouse pointer over the yellow ? marks in the Git tab, you’ll see a tooltip telling us that the file is untracked. This means that Git is not tracking versions of this file yet. Tick staged for each file.
Getting your project under version control: Key concepts
Now the next key idea:
A commit is a saved snapshot in your project history
It records the staged changes at one meaningful point in time
Commits let you review what changed and return to earlier states if needed
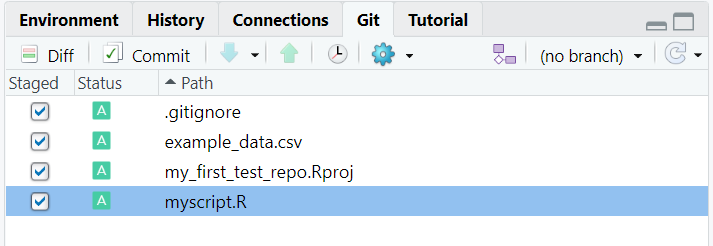
Getting your project under version control
Step 3: Our staged files are now ready for the first commit. Click on the commit button.
Getting your project under version control: Key concepts
Every commit needs a message:
A commit message explains what changed (and ideally why)
Good messages are short, specific, and useful for your future self. They start with a verb in imperative mode, such as: Add, Fix, Improve
Example: Add first analysis script and dataset import
Getting your project under version control
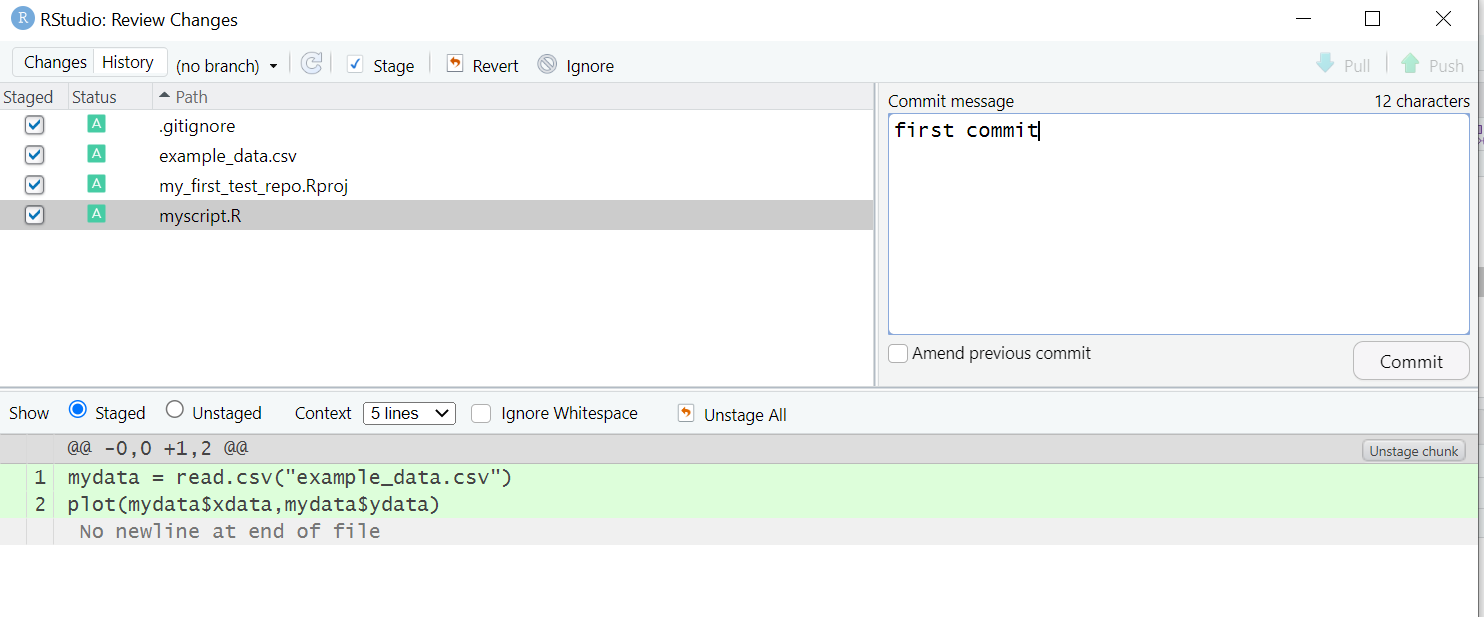
Step 4: Specify a commit message, which is a brief description of the changes you made. For now, we will add the commit message First commit. Then click on Commit.
Getting your project under version control
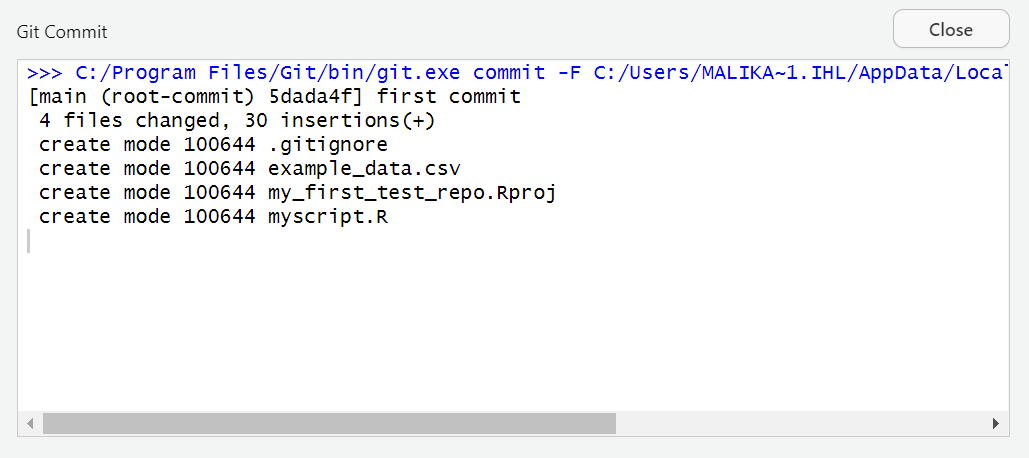
Step 5: Check the message from git. If no errors appear, everything is fine. Click on close - finished!
Making changes
Now we want to make some actual changes to practise using Git and to show how Git handles modifications of files.
Step 1: Add the following code to your existing R script:
myscript.R
# some guesses for the parameters.p1 =1p2 =0.2# do the fitfit =nls(ydata ~ p1*cos(p2*xdata) + p2*sin(p1*xdata), data = mydata, start =list(p1=p1,p2=p2))#Plot the fitted linenew =data.frame(xdata =seq(min(mydata$xdata),max(mydata$xdata),len=200))lines(new$xdata,predict(fit,newdata=new))
Making changes
Step 2: Change the command that plots our data in this file.
Change the line
myscript.R
plot(mydata$xdata,mydata$ydata)
to
myscript.R
plot(mydata$xdata,mydata$ydata,col='red')
and run this code.
Making changes: Optional Exercise
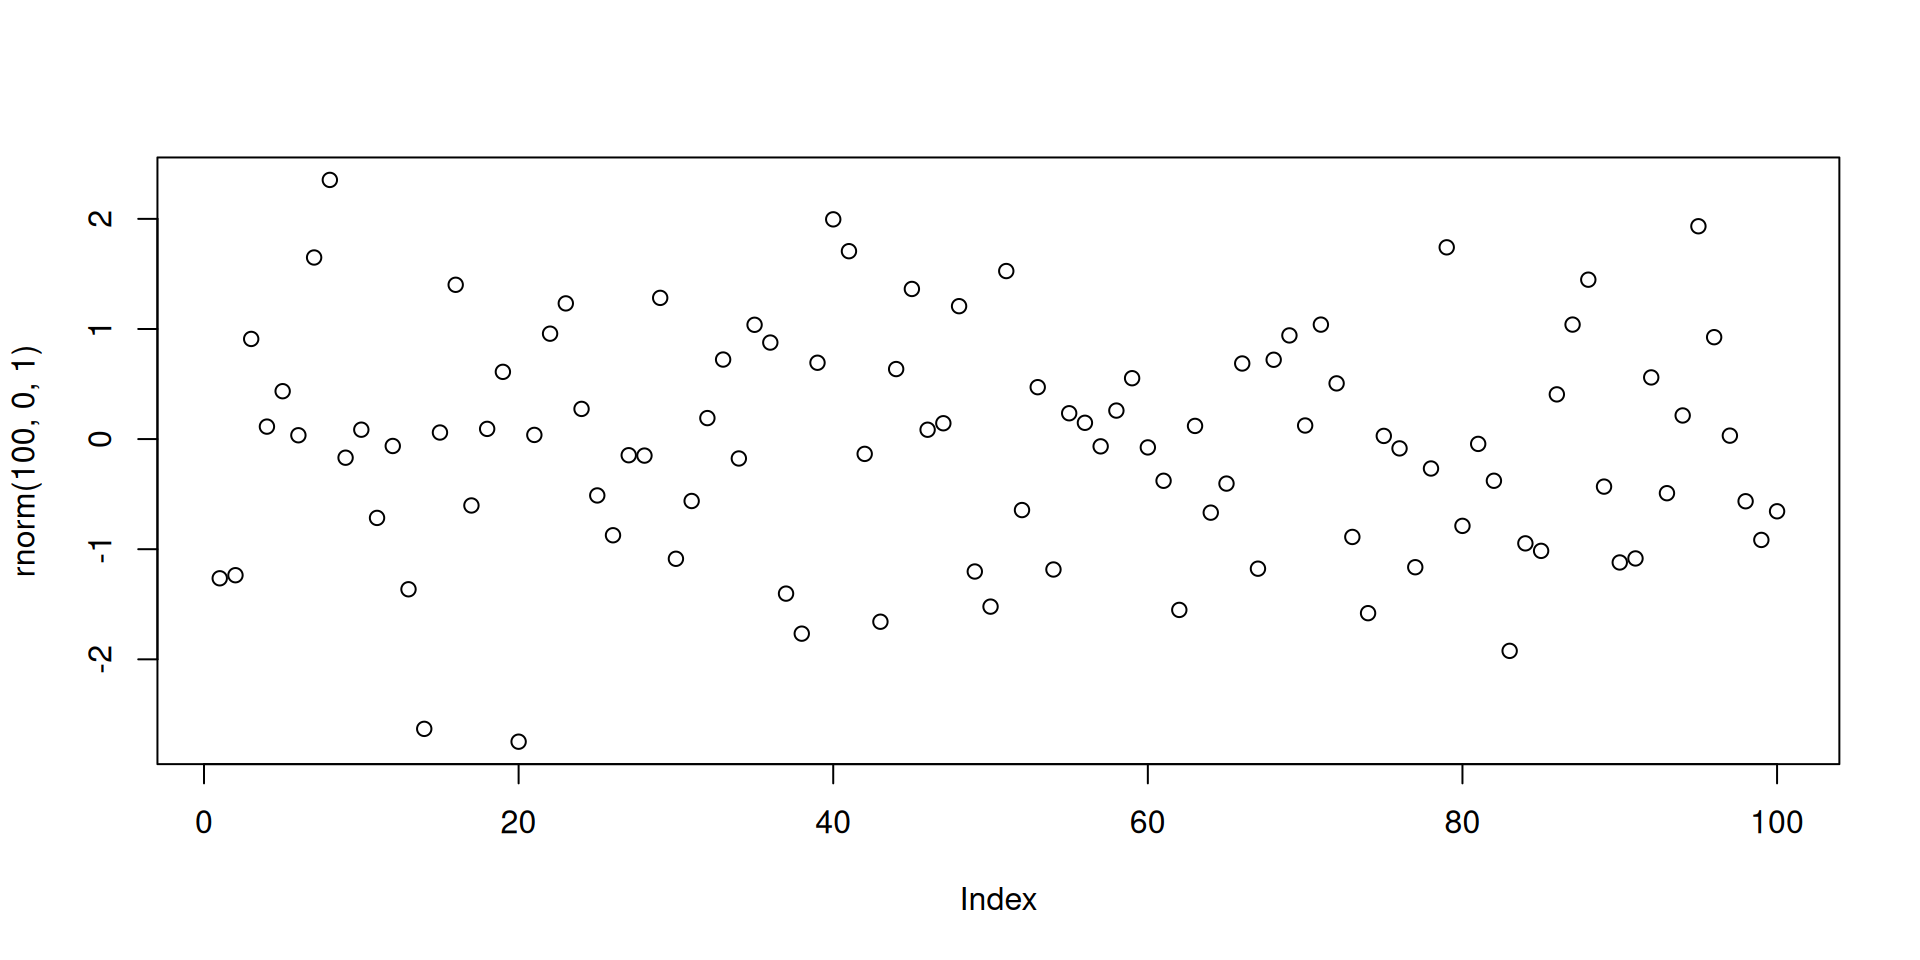
Step 3 (optional): Create another R file with File > New File > R script. Save as simulation_script.R. Then add and run the code below in the new R script:
#Simulate some dataplot(rnorm(100,0,1))
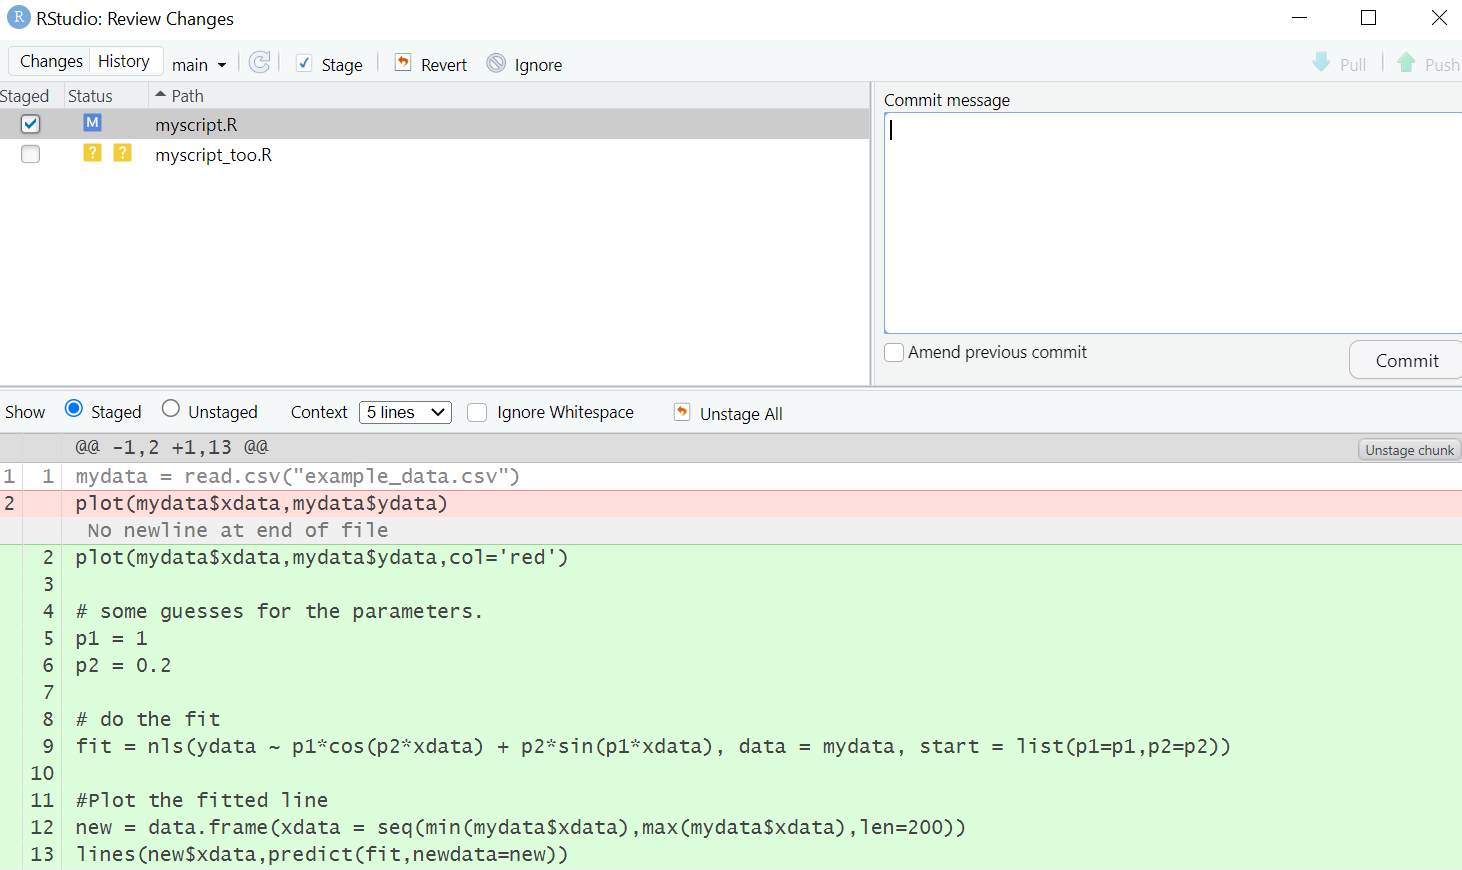
Committing changes
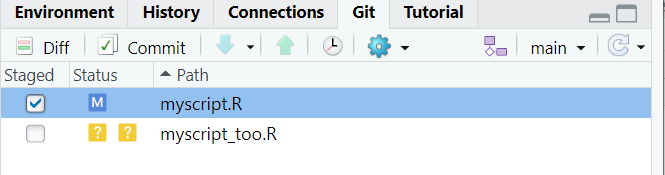
Click on the git tab in the top right corner. Two files appeared, the script we modified and the new script.
Step 1: Click on the staged box to stage changes for the first script.
Committing changes
Step 2: Click on Diff for a reminder summary of what changed. Then add a commit message and click commit.
Important
Remember that Git track differences between two files. Lines that have been added are green. Lines that have been removed are red.
Practical exercise 1
Note
By default, the history search feature will show all files added, changed, or deleted for each commit. This can be extremely useful for finding bugs or looking back to how your project looked a few months ago. However, it is often more practical to review the changes made to a single file over time; this enables, for example, clear tracking of the evolution of data cleaning and analysis steps in your project.
Connecting the local repository to GitHub
The project is now under version control. Time to create a new GitHub repository and upload to GitHub!
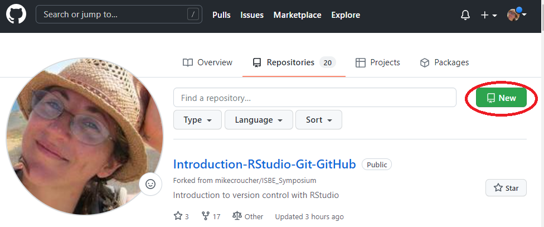
Step 1: Log into GitHub and go to your profile page. On the repositories tab, click New.
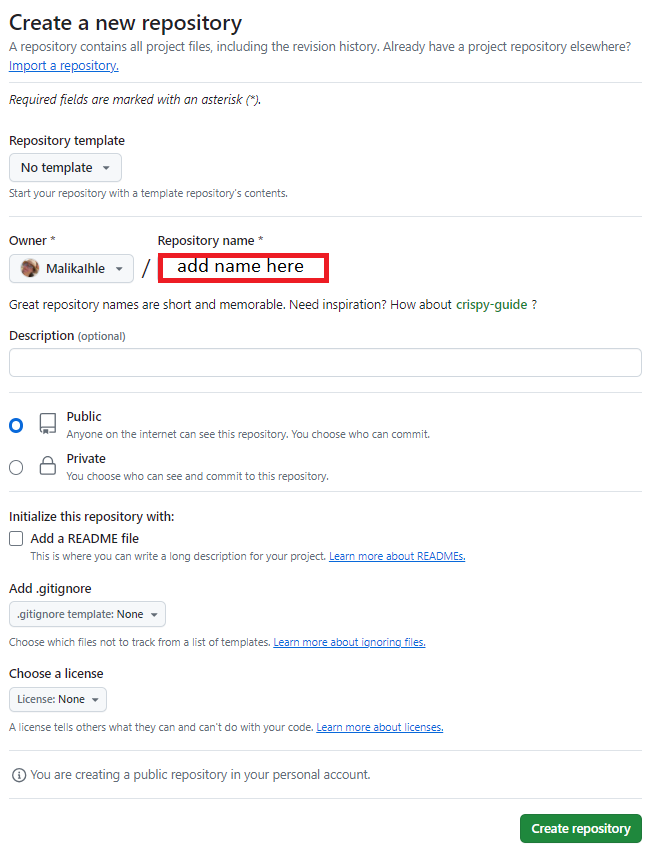
Connecting the local repository to GitHub
Step 2: Give the repository a name and click Create Repository.
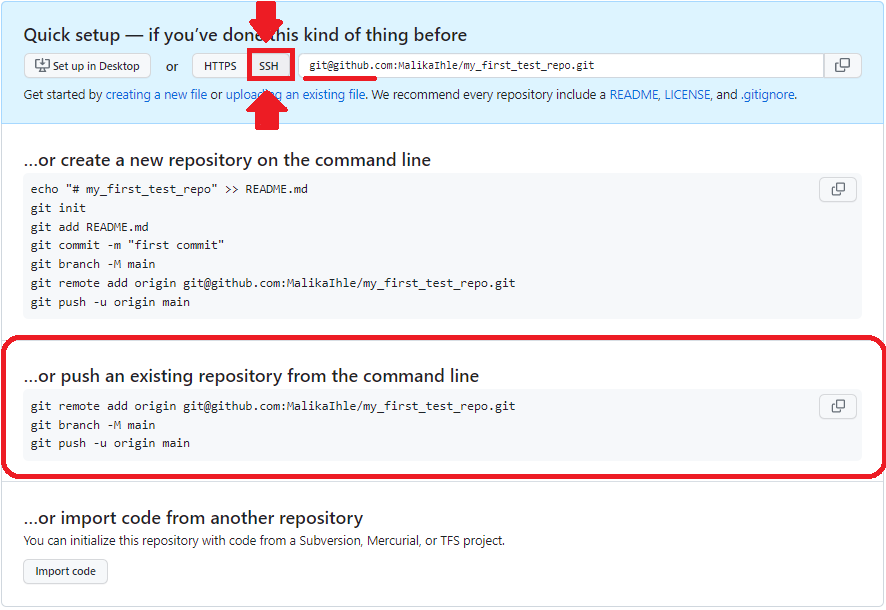
Connecting the local repository to GitHub
Step 3: Configure the repository in the Quick Setup screen. Select the SSH tab and make sure the url shown in the blue box should start with git@github.com.
Connecting the local repository to GitHub
Step 4: Copy the commands from the or push an existing repository from the command line to your clipboard with the GitHub copy button.
Connecting the local repository to GitHub
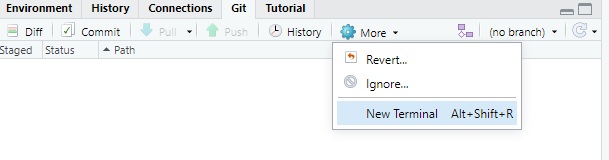
Step 5: Go to RStudio, navigate to the git tab and Click on More > New Terminal.
Connecting the local repository to GitHub
Step 6: Paste the git commands from your clipboard into the terminal and press enter to execute them. Insert your SSH passphrase if prompted or type
yes
when a sentence about continuing to connect appears in the terminal.
Connecting the local repository to GitHub
Step 7: Check that your local repository with your RStudio Project appears on your GitHub profile (please refresh the page once).
Note
You only need to upload your local repository once to GitHub. In the subsequent section, we explain how to sync (or push) your local changes in your RStudio project with the remote repository you just created on GitHub.
Making changes: Adding a README to your RStudio Project
Imagine that as a follow-up step, we want to add a README file to the RStudio project folder.
Note
A README file is a short document that explains what your R project is about and can be viewed as a sort of Welcome Guide. It usually includes things like:
What the project does and who made it
What files or data are included
How to use or run the code
Any special setup or packages needed
Adding a README to your RStudio Project
Step 1: In RStudio, click on File > New File > Text File. Add the following text to the file and save it as README.md:
README.md
# My Example RepoThis repo is used to demonstrate GitHub to users of R and R Studio.
Adding a README to your RStudio Project
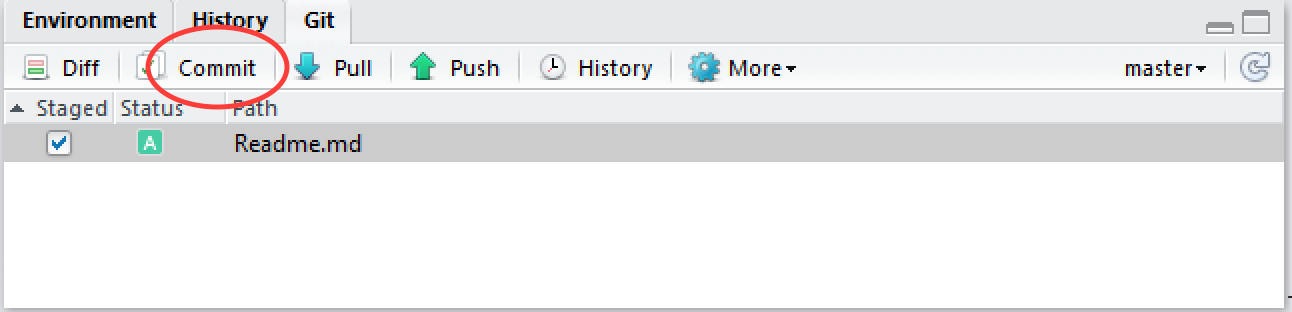
Step 2: In the git tab, you should see the new Readme.md file (and only that one!). Stage the file and press commit.
Adding a README to your RStudio Project
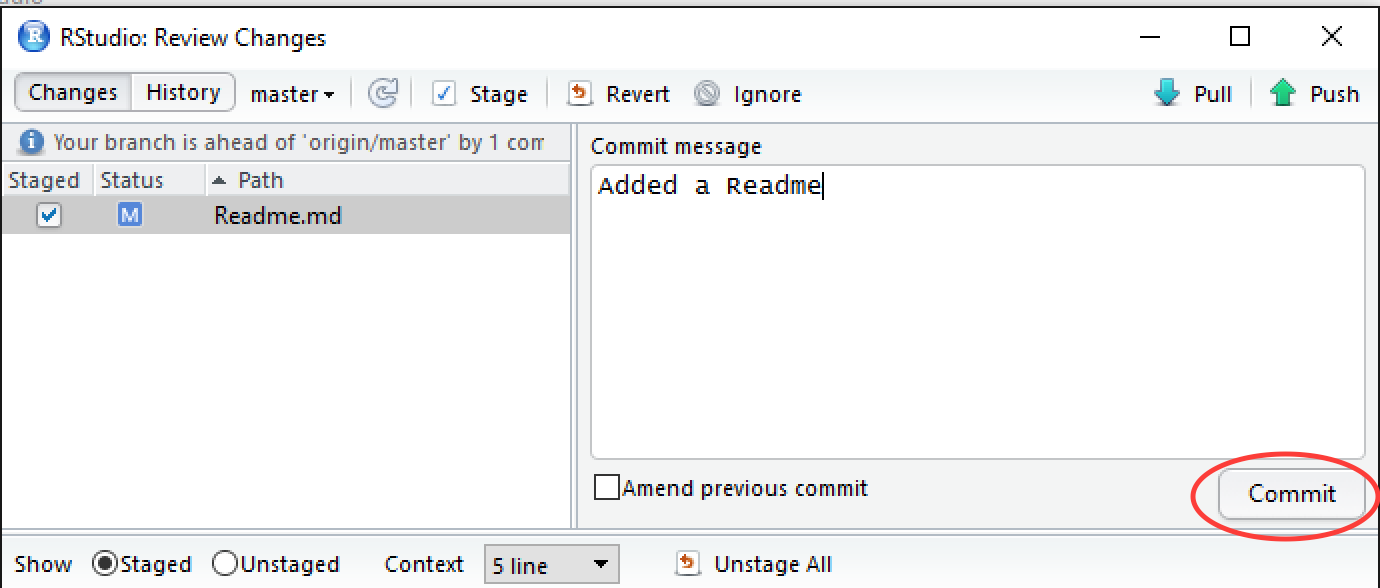
Step 3: Add a new commit message and press Commit in the bottom right corner.
Note
Note that the window might disappear after pressing Commit. This is nothing unusual, but in that case, please re-open it for Step 4 on the next slide.
Adding a README to your RStudio Project
Step 4: Push the changes to upload to GitHub by pressing the button in the top right corner with the green arrow pointing upwards.
When to stage and commit?
Important
Great question! The point of version control is to have a track record of changes and that you can undo/redo any changes at any time. Therefore, you should stage and commit your changes to version control whenever you finished a clear, logical “unit”, e.g.:
Added a code chuck or function
Cleaned your dataset
Created a new figure
Updated a paragraph
RECAP: Version control in RStudio with Git
What have we done so far?
Created an RStudio Project in a local repository ✅
Created files for the project (code, downloaded data etc.) ✅
Added version control to our project in the local repository ✅
Made changes and commit these changes locally ✅
Connected the local repository with a remote repository ✅
Synchronised ( = pushed ) the local changes to the remote repository ✅
OVERVIEW: The Git/GitHub workflow
What do I need to do?
Make changes locally
Stage changes locally
Commit changes locally with a commit message
Push local changes to the remote repository on GitHub
Once you have brought your local repository under version control and connected the remote repository, you will find yourself repeating the same steps above over and over.
Activity: One-Minute Paper!
Why is version control important and useful?Take one minute to write down your thoughts on some paper.
Why is version control important and useful?
Some thoughts …
Tracks every change in your R project and acts as a “time machine” for your code/files
Makes mistakes easy to fix because you can revert to earlier versions anytime
Improves reproducibility by seeing what changed, when, and why it changed
Provides a backup via GitHub for easy sharing and access anywhere
Reflection
Take 10 minutes now to reflect upon where in your own current or future research you could use Git. Write then the steps you will need to implement what you have learned here in that project and which barriers you may face” (e.g., technical, project partners/supervisors, etc.)
Assignment: Practising the workflow
This is a dataset containing the number of athletes that participated in the Summer Olympics over the years.
Tip
When creating the new RStudio project, make sure to check Create a git repository.
Assignment: Practising the workflow
(cont.)
Tip
For the plot, use geom_line() to plot the number of athletes at the Summer Olympics over the years.
Take-home message
What are you taking away from today?
Keep practising!
It is all about practise until you develop a routine.
To conclude: Survey time!
Which of the following concepts or skills do you now feel more confident about in relation to version control? (Select all that apply)
Git
GitHub
Repositories
RStudio Project
I am (still) not sure about any of these concepts.
On a scale of 1 to 5, how comfortable are you with using Git for version control? (1 = Not comfortable at all, 5 = Very comfortable)
1
2
3
4
5
Discussion of survey results
What do we see in the results and how do they compare to the previous ratings?
Always remember …
And of course…
Practice
Practice some more
More practice
… and: MORE PRACTICE
Note
At this point it perhaps still feels a little strange and slightly unnerving, keep going!
Help and support
If you get stuck, there is plently of help available:
Some general pointers on where learners could run into issues:
Mistyping the Git commands: Correct spelling (including spaces) matters, else Git will not recognize the command
FAQ
Here a collection of some general questions from users:
How often should I commit? Commit early and often after a “work” unit (whatever this could mean for your specific work), better to committ too often that too little. See here for more general guidelines: https://www.simplethread.com/what-makes-a-good-git-commit/.
How often should I push my changes? Professional coders push up to 100 times per day (during an eight hour workday). You can consider pushing after every commit, at the minimum several times per day.
Do I need to save my files before committing the changes?: Committing means taking a snapshot of the state your current files are in, if you have not saved your work you have not made any “actual” changes to a file. Committing an unsaved file would result in committing the same file as per prior commit.